文章目录
Toggle前言
在上一章课程【课程总结】Day13(上):使用YOLO进行目标检测,我们了解到目标检测有两种策略,一种是以YOLO为代表的策略:特征提取→切片→分类回归;另外一种是以MTCNN为代表的策略:先图像切片→特征提取→分类和回归。因此,本章内容将深入了解MTCNN模型,包括:MTCNN的模型组成、模型训练过程、模型预测过程等。
人脸识别
在展开了解MTCNN之前,我们对人脸检测先做一个初步的梳理和了解。人脸识别细分有两种:人脸检测和人脸身份识别。
人脸检测
简述
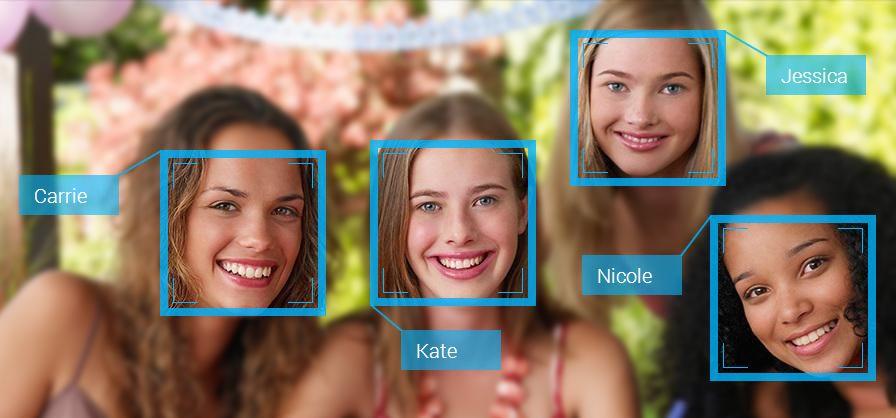
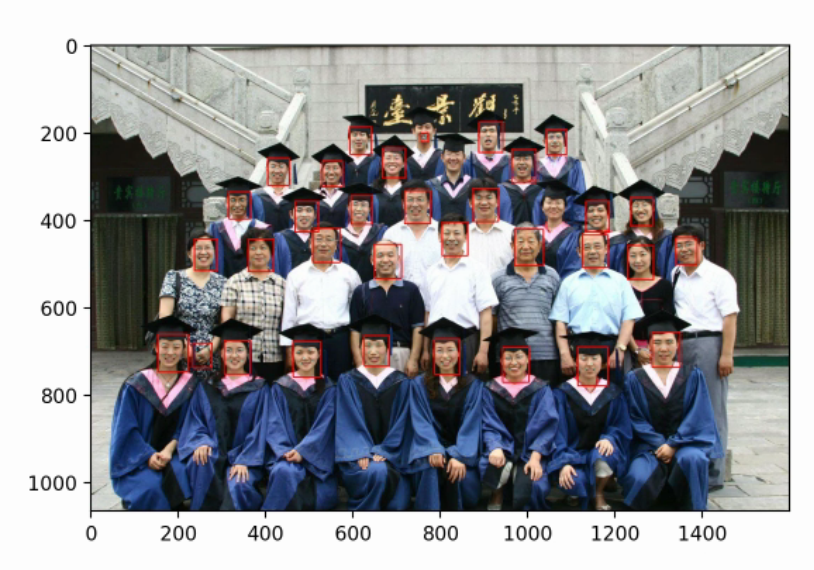
人脸检测是一个重要的应用领域,它通常用于识别图像或视频中的人脸,并定位其位置。
识别过程
- 输入图像:首先,将包含人脸的图像输入到人脸检测模型中。
- 特征提取:深度学习模型将学习提取图像中的特征,以便识别人脸。
- 人脸定位:模型通过在图像中定位人脸的位置,通常使用矩形边界框来框定人脸区域。
- 输出结果:最终输出包含人脸位置信息的结果,可以是边界框的坐标或其他形式的标注。
输入输出
- 输入:一张图像
- 输出:所有人脸的坐标框
应用场景
人脸检测特点
人脸检测是目标检测中最简单的任务
- 类别少
- 人脸形状比较固定
- 人脸特征比较固定
- 周围环境一般比较好
人脸身份识别
简述
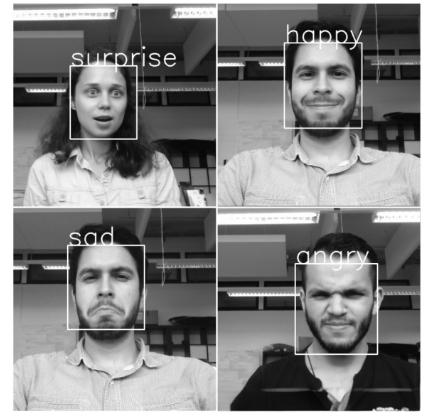
人脸身份识别是指通过识别人脸上的独特特征来确定一个人的身份。
识别过程
人脸录入流程:
- 数据采集:采集包含人脸的图像数据集。
- 人脸检测:使用人脸检测算法定位图像中的人脸区域。
- 人脸特征提取:通过深度学习模型提取人脸图像的特征向量。
- 特征向量存储:将提取到的特征向量存储在向量数据库中。
人脸验证流程:
- 人脸检测:使用人脸检测算法定位图像中的人脸区域。
- 人脸特征提取:通过深度学习模型提取人脸图像的特征向量。
- 人脸特征匹配:将输入人脸的特征向量与向量数据库中的特征向量进行匹配。
- 身份识别:根据匹配结果确定输入人脸的身份信息。
应用领域
- 安防监控:用于门禁系统、监控系统等,实现人脸识别进出控制。
- 移动支付:通过人脸识别来进行身份验证,实现安全的移动支付功能。
- 社交媒体:用于自动标记照片中的人物,方便用户管理照片。
- 人机交互:实现人脸识别登录、人脸解锁等功能。

一般来说,一切目标检测算法都可以做人脸检测,但是由于通用目标检测算法做人脸检测太重了,所以会使用专门的人脸识别算法,而MTCNN就是这样一个轻量级和专业级的人脸检测网络。
MTCNN模型
简介
MTCNN(Multi-Task Cascaded Convolutional Neural Networks)是一种用于人脸检测和面部对齐的神经网络模型。
论文地址:https://arxiv.org/abs/1604.02878v1
模型结构
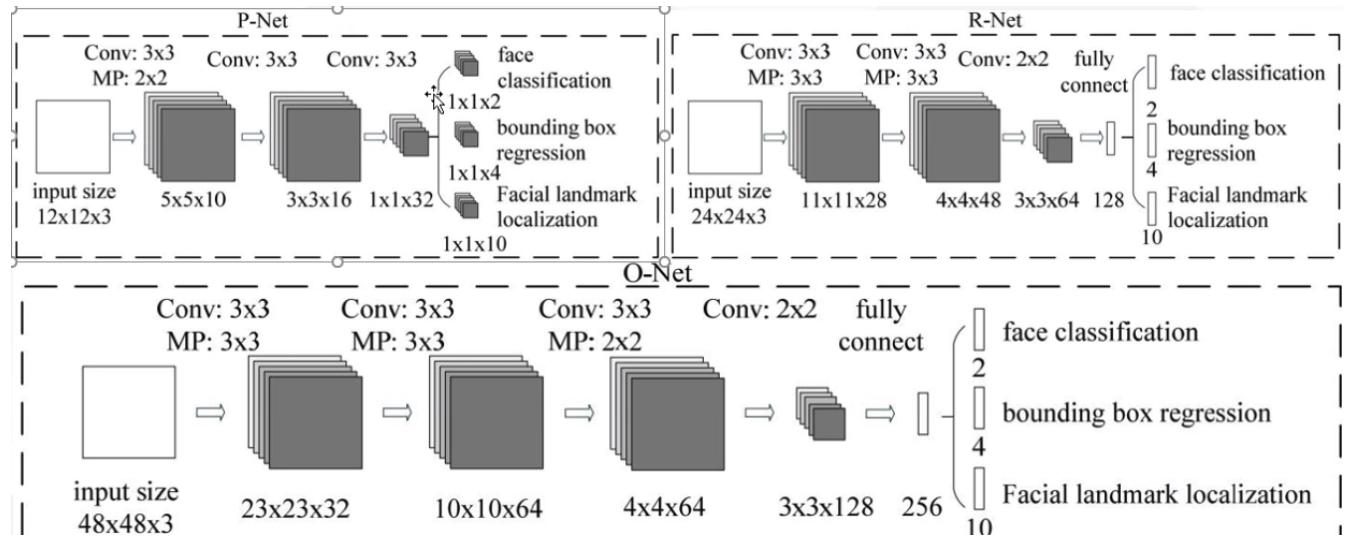
- MTCNN采用了级联结构,包括三个阶段的深度卷积网络,分别用于人脸检测和面部对齐。
- 每个阶段都有不同的任务,包括人脸边界框回归、人脸关键点定位等。
这个级联过程,相当于
海选→淘汰赛→决赛的过程。
整体流程
上图是论文中对于MTCNN整体过程的图示,我们换一种较为容易易懂的图示来理解整体过程:
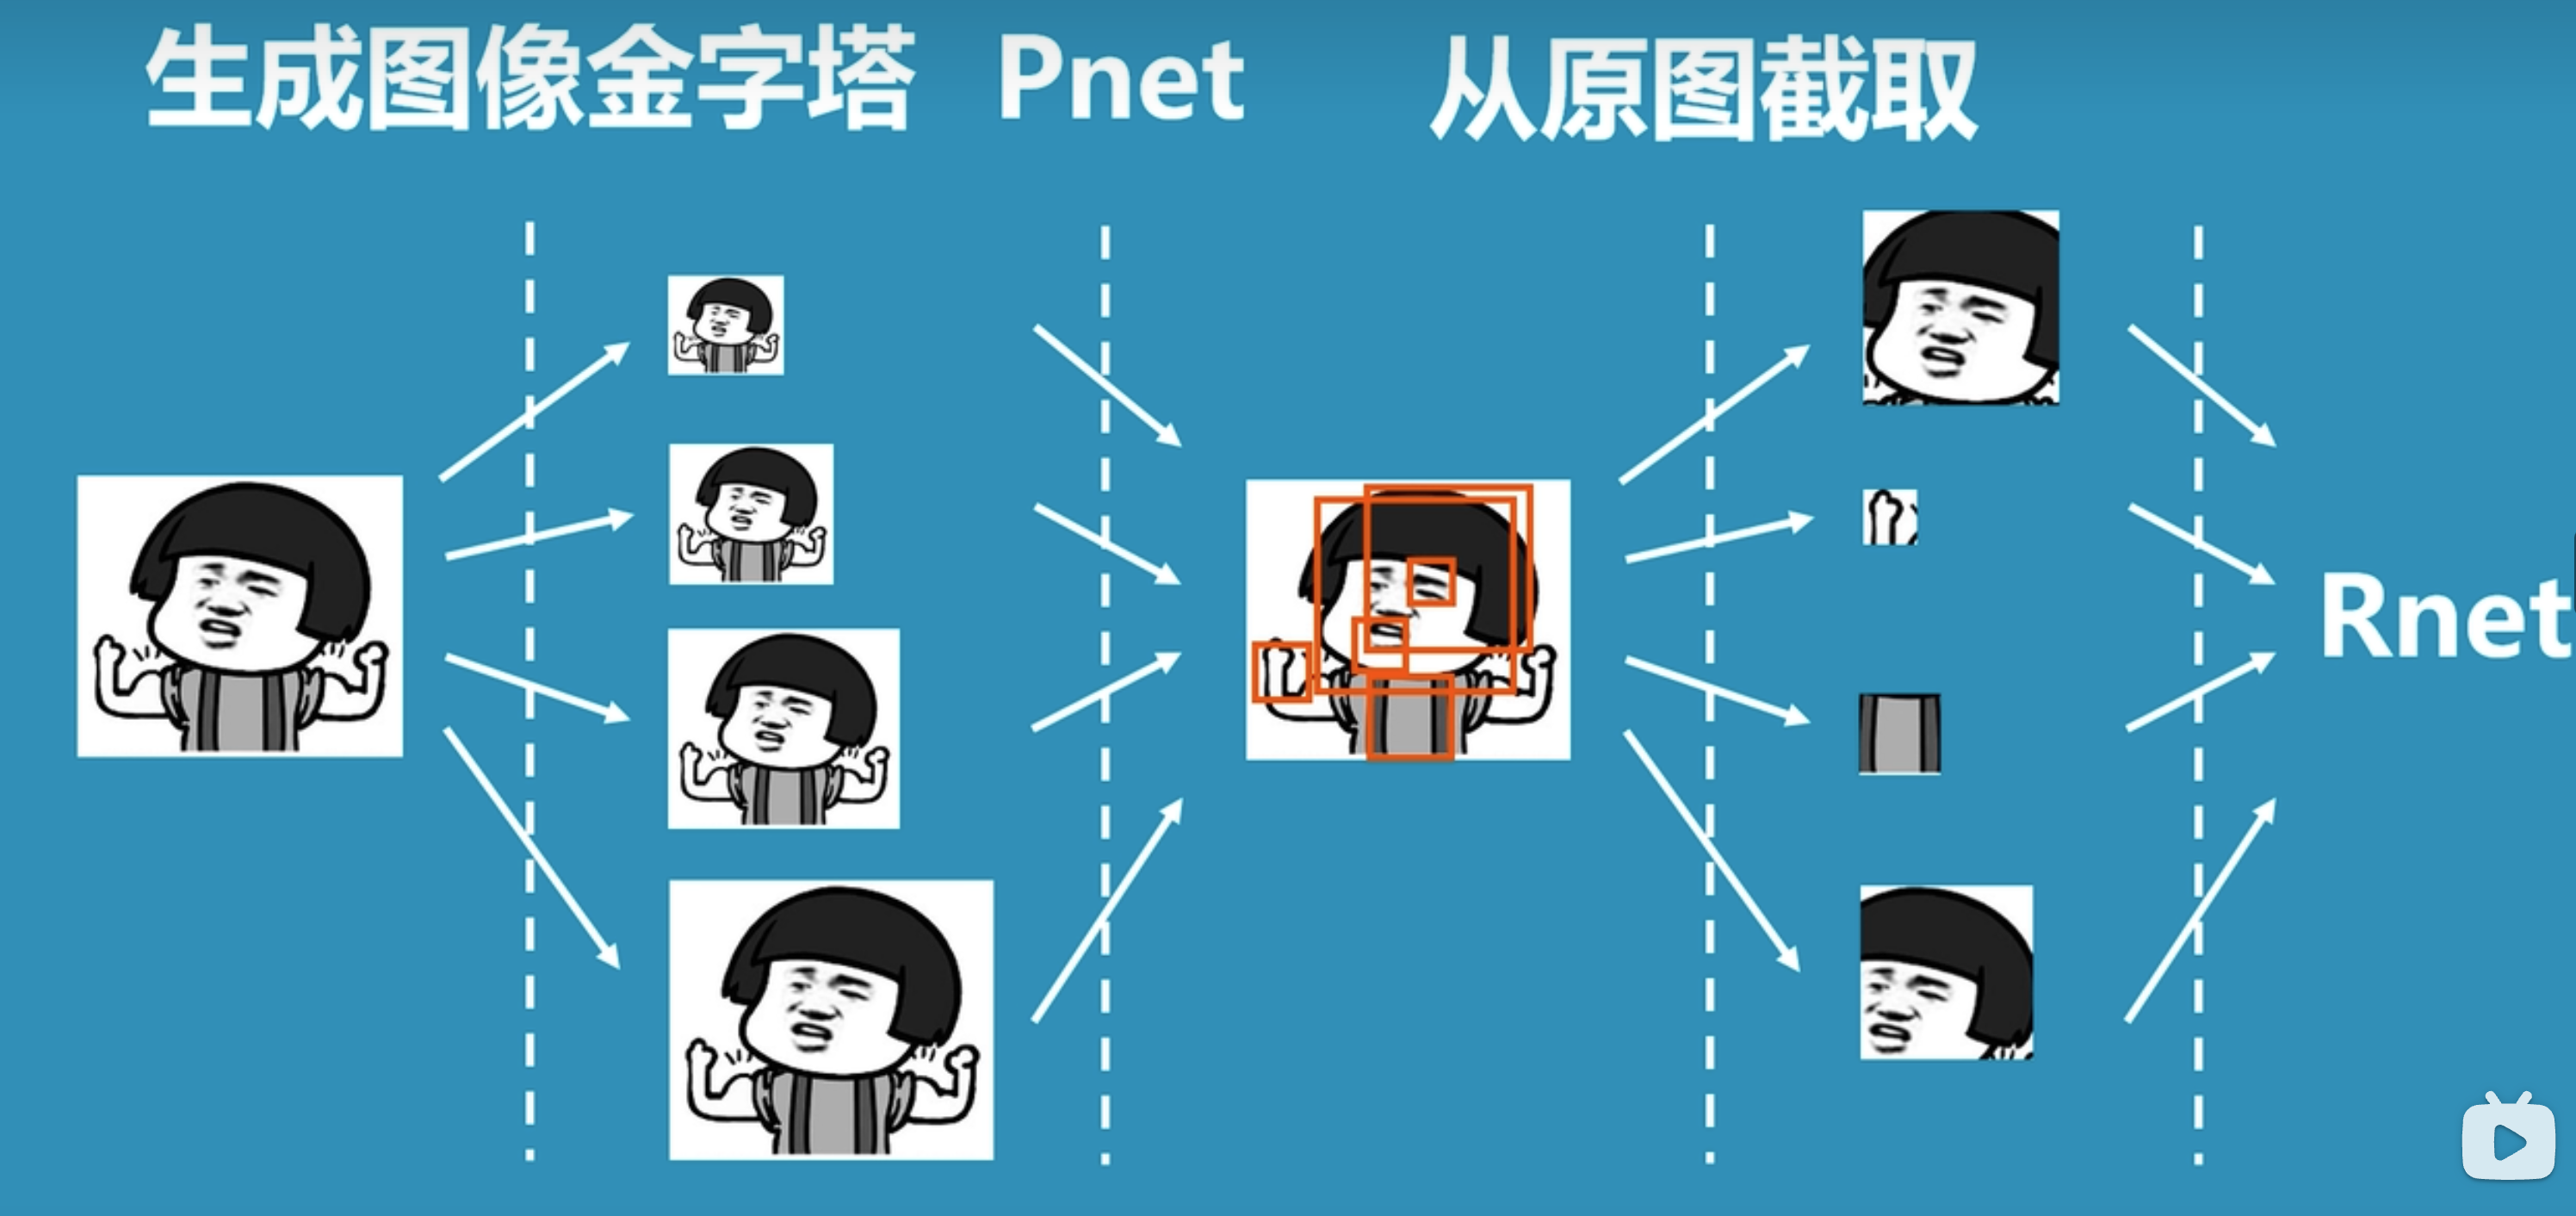
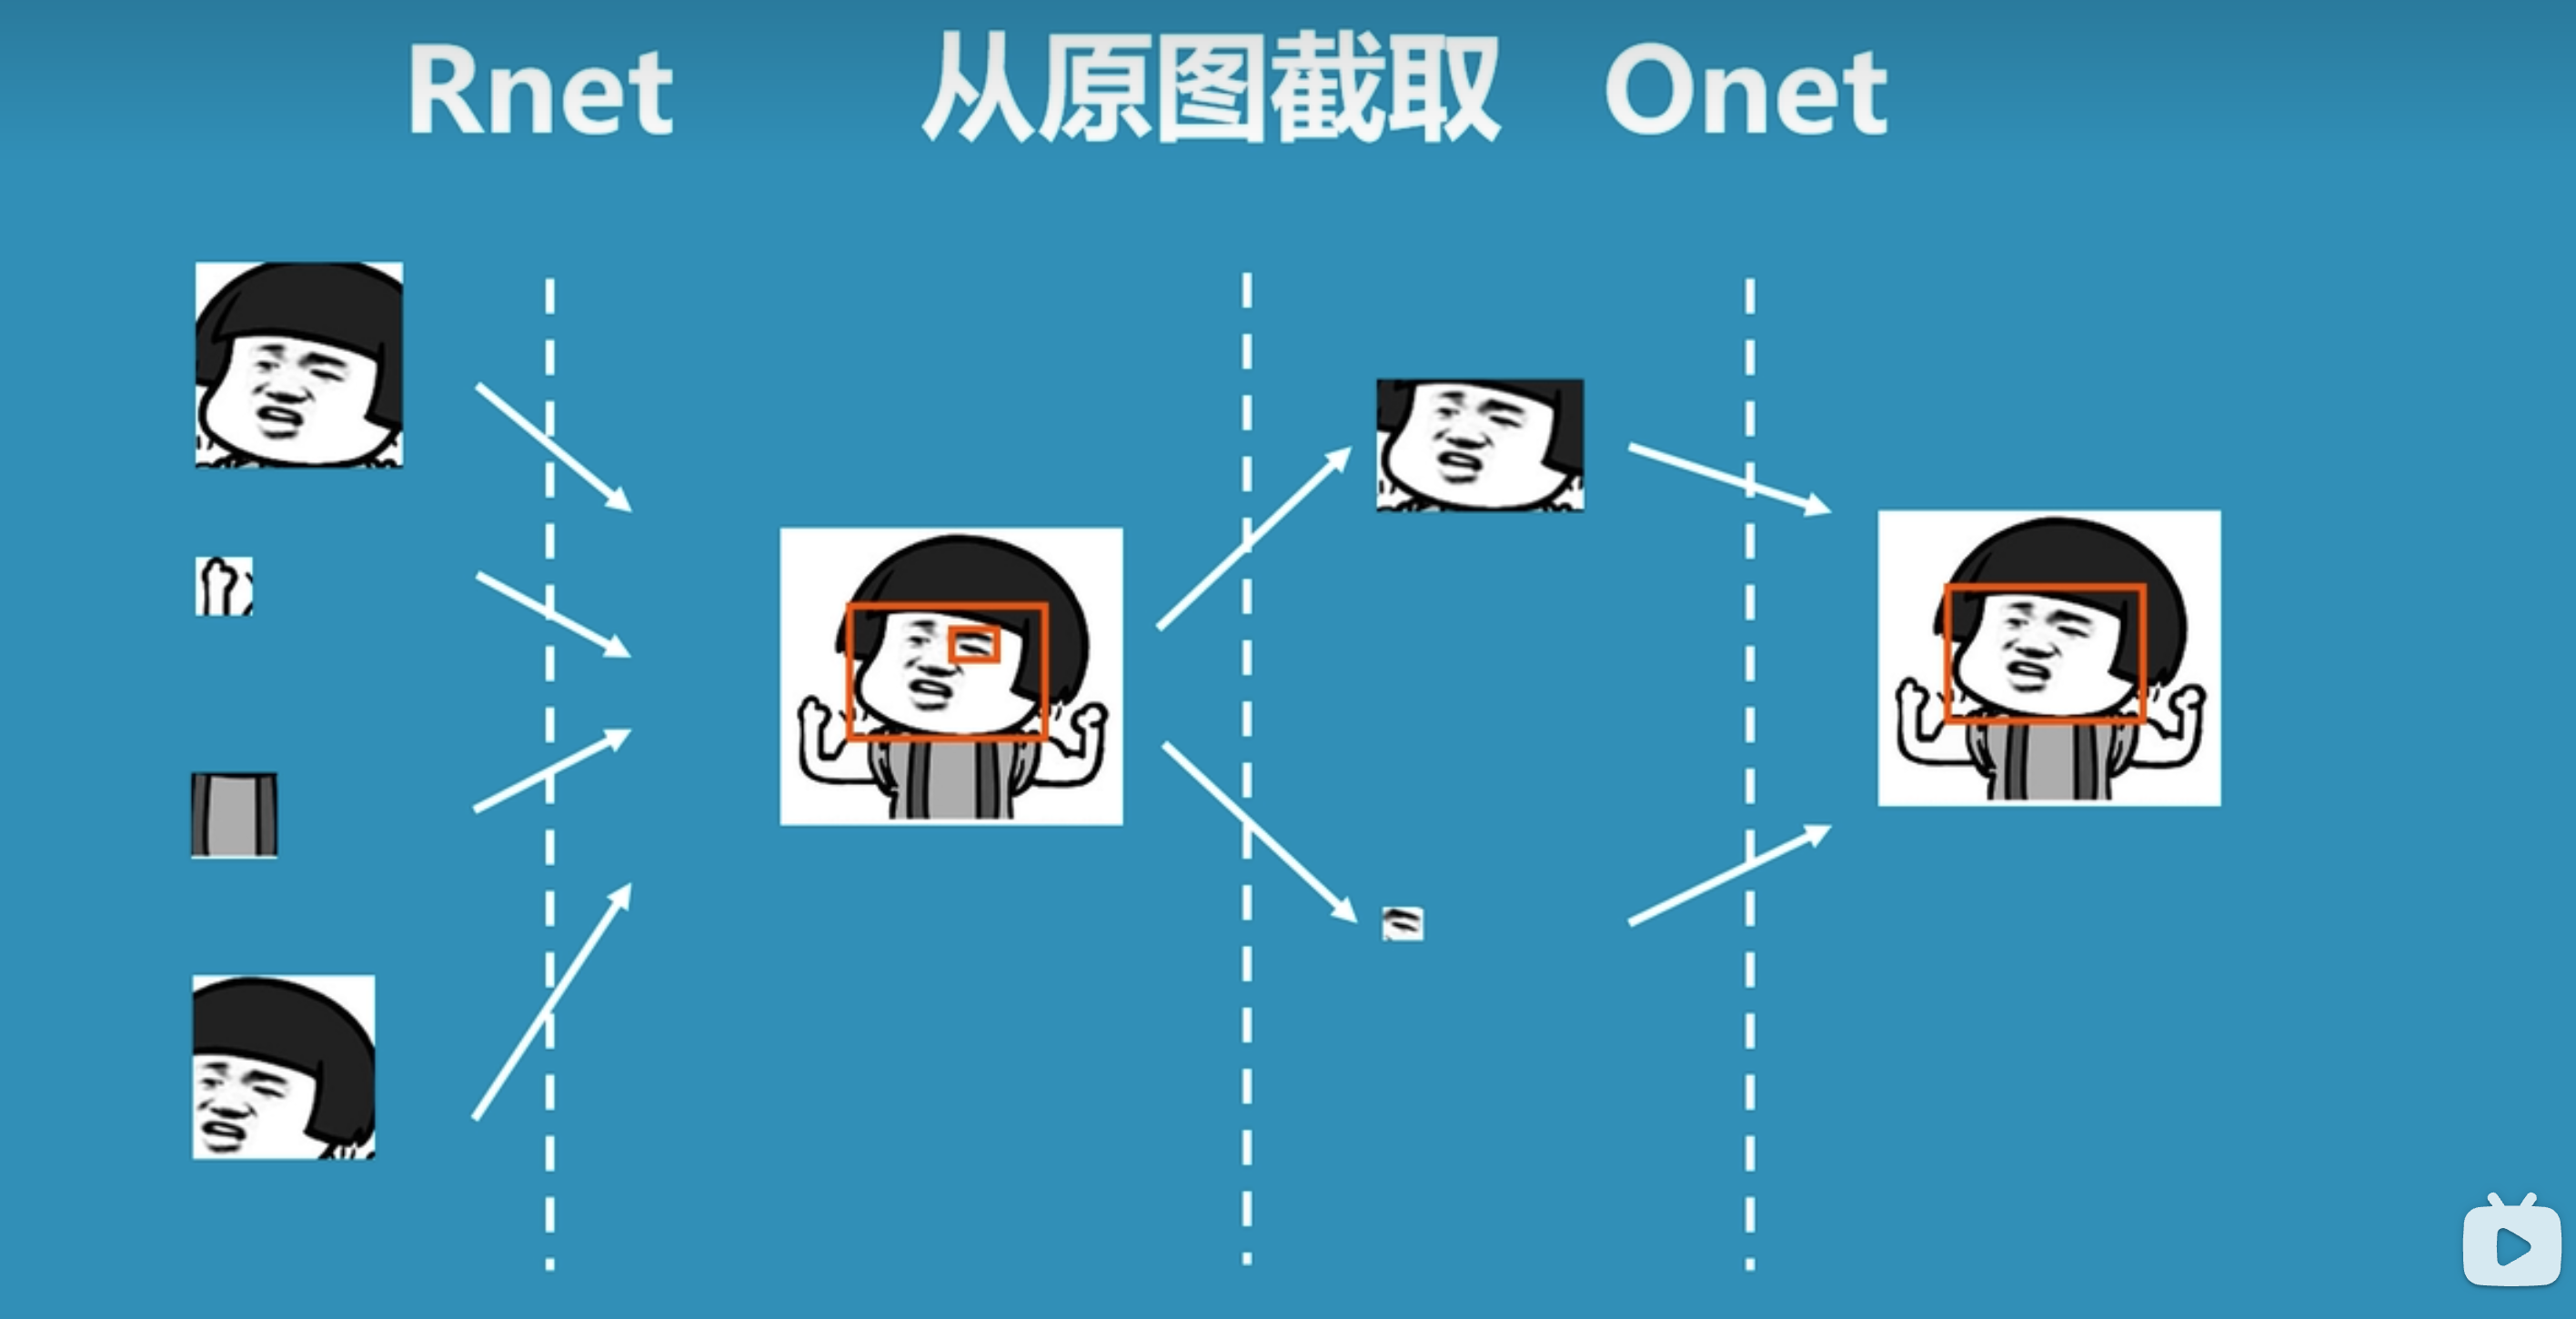
- 先将图片生成不同尺寸的图像金字塔,以便识别不同大小的人脸。
- 将图片输入到P-net中,识别出可能包含人脸的候选窗口。
- 将P-net中识别的可能人脸的候选窗口输入到R-net中,识别出更精确的人脸位置。
- 将R-net中识别的人脸位置输入到O-net中,进行更加精细化识别,从而找到人脸区域。
备注:上图引用自科普:什么是mtcnn人脸检测算法
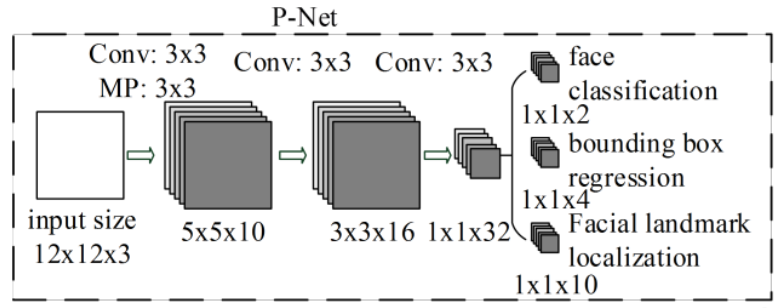
P-net:人脸检测
- 名称:提议网络(proposal network)
- 作用:P网络通过卷积神经网络(CNN)对输入图像进行处理,识别出可能包含人脸的候选窗口,并对这些候选窗口进行边界框的回归,以更准确地定位人脸位置。
- 特点:
- 纯卷积网络,无全链接(精髓所在)
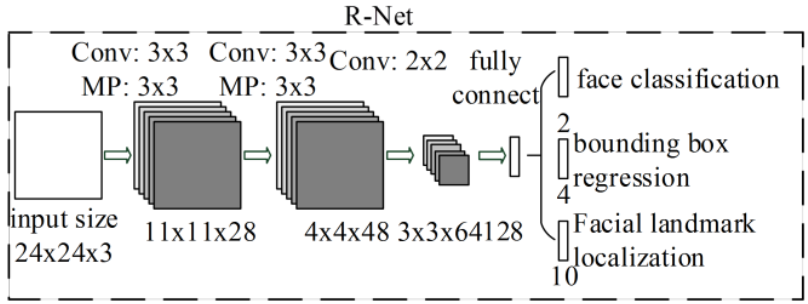
R-net:人脸对齐
- 名称:精修网络(refine network)
- 作用:R网络通过分类器和回归器对P网络生成的候选窗口进行处理,进一步筛选出包含人脸的区域,并对人脸位置进行修正,以提高人脸检测的准确性。
O-net:人脸识别
- 名称:输出网络(output network)
- 作用:O网络通过更深层次的卷积神经网络处理人脸区域,优化人脸位置和姿态,并输出面部关键点信息,为后续的面部对齐提供重要参考。
MTCNN用到的主要模块
图像金字塔
MTCNN的P网络使用的检测方式是:设置建议框,用建议框在图片上滑动检测人脸
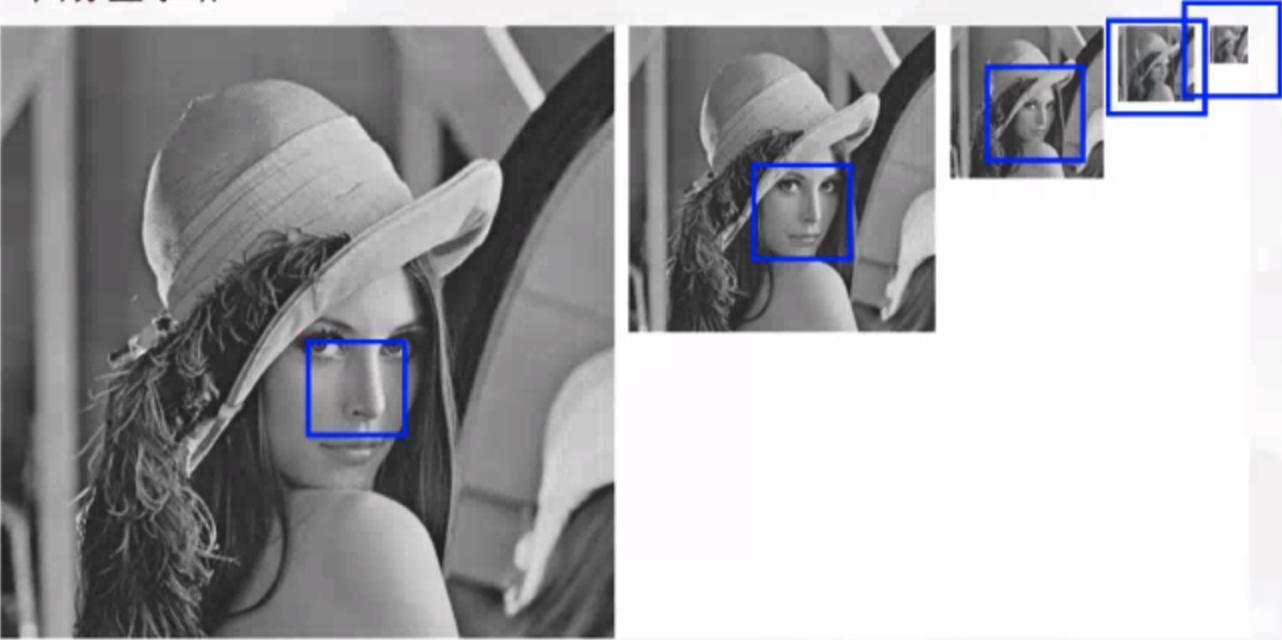
由于P网络的建议框的大小是固定的,只能检测12*12范围内的人脸,所以其不断缩小图片以适应于建议框的大小,当下一次图像的最小边长小于12时,停止缩放。
IOU
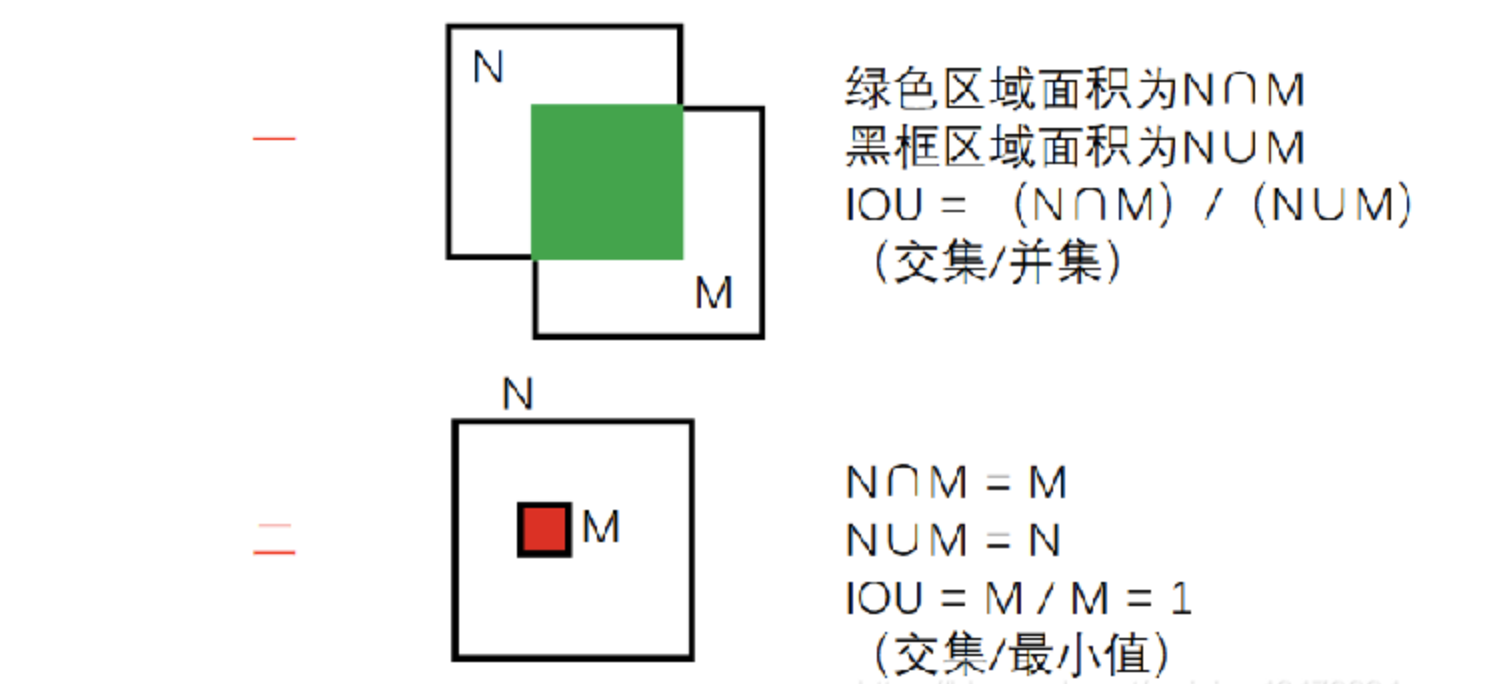
定义:IOU(Intersection over Union)是指交并比,是目标检测领域常用的一种评估指标,用于衡量两个边界框(Bounding Box)之间的重叠程度。
两种方式:
O网络iou值大于阈值的框被认为是重复的框会丢弃,留下iou值小的框,但是如果出现了下图中大框套小框的情况,则iou值偏小也会被保留,是我们不想看到的,因此我们在O网络采用了第二种方式的iou以提高误检率。
NMS(Non-Maximum Suppression,非极大值抑制)
定义:
NMS是一种目标检测中常用的技术,旨在消除重叠较多的候选框,保留最具代表性的边界框,以提高检测的准确性和效率。
工作原理:
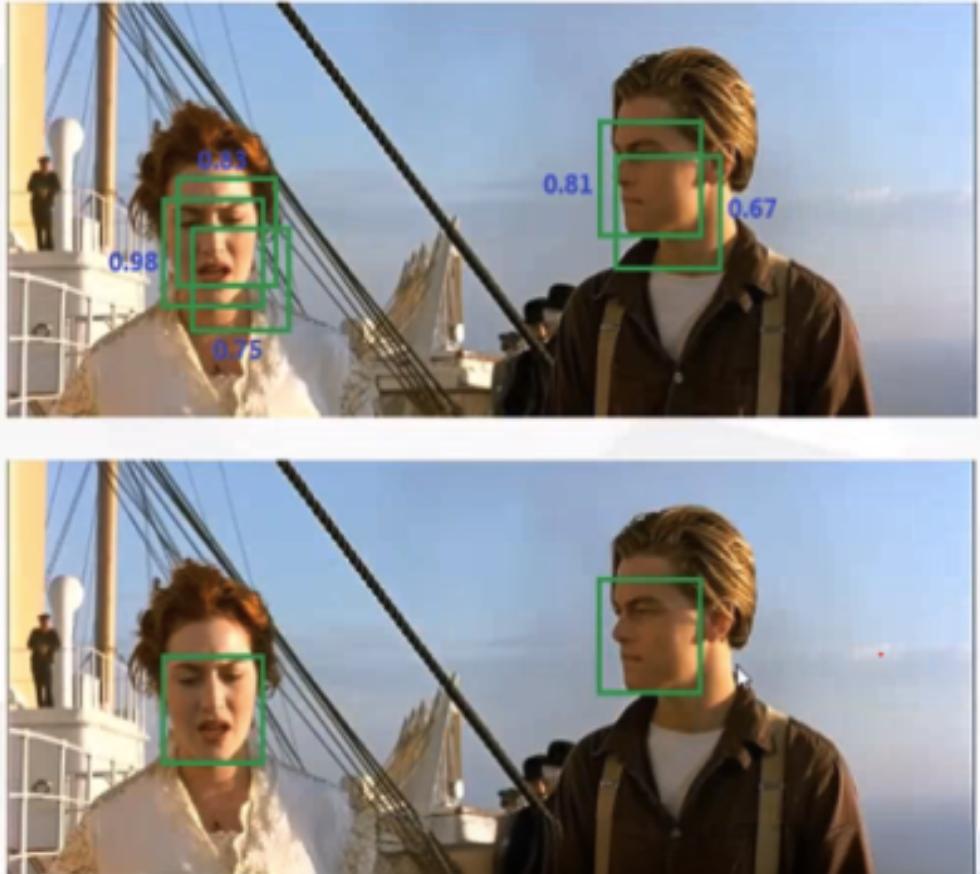
NMS的工作原理是通过设置一个阈值,比如IOU(交并比)阈值,对所有候选框按照置信度进行排序,然后从置信度最高的候选框开始,将与其重叠度高于阈值的候选框剔除,保留置信度最高的候选框。
- 如上图所示框出了五个人脸,置信度分别为0.98,0.83,0.75,0.81,0.67,前三个置信度对应左侧的Rose,后两个对应右侧的Jack。
- NMS将这五个框根据置信度排序,取出最大的置信度(0.98)的框分别和剩下的框做iou,保留iou小于阈值的框(代码中阈值设置的是0.3),这样就剩下0.81和0.67这两个框了。
- 重复上面的过程,取出置信度(0.81)大的框和剩下的框做iou,保留iou小于阈值的框。这样最后只剩下0.98和0.81这两个人脸框了。
代码实现
import torch
from torch import nn

"""
    P-Net
"""

class PNet(nn.Module):
    def __init__(self):
        super().__init__()
        self.features_extractor = nn.Sequential(
            # 第一层卷积
            nn.Conv2d(in_channels=3, out_channels=10, kernel_size=3, stride=1, padding=0),
            nn.BatchNorm2d(num_features=10),
            nn.ReLU(),

            # 第一层池化
            nn.MaxPool2d(kernel_size=3,stride=2, padding=1),

            # 第二层卷积
            nn.Conv2d(in_channels=10, out_channels=16, kernel_size=3, stride=1, padding=0),
            nn.BatchNorm2d(num_features=16),
            nn.ReLU(),

            # 第三层卷积
            nn.Conv2d(in_channels=16, out_channels=32, kernel_size=3, stride=1, padding=0),
            nn.BatchNorm2d(num_features=32),
            nn.ReLU()
        )

        # 概率输出
        self.cls_out = nn.Conv2d(in_channels=32, out_channels=2, kernel_size=1, stride=1, padding=0)
        # 回归量输出
        self.reg_out = nn.Conv2d(in_channels=32, out_channels=4, kernel_size=1, stride=1, padding=0)

    def forward(self, x):
        print(x.shape)
        x = self.features_extractor(x)
        cls_out = self.cls_out(x)
        reg_out = self.reg_out(x)

return cls_out, reg_outimport torch
from torch import nn
class RNet(nn.Module):
def __init__(self):
super().__init__()
self.feature_extractor = nn.Sequential(
# 第一层卷积 24 x 24
nn.Conv2d(in_channels=3, out_channels=28, kernel_size=3, stride=1, padding=0),
nn.BatchNorm2d(num_features=28),
nn.ReLU(),
# 第一层池化 11 x 11
nn.MaxPool2d(kernel_size=3, stride=2, padding=1, ceil_mode=False),
# 第二层卷积 9 x 9
nn.Conv2d(in_channels=28, out_channels=48, kernel_size=3, stride=1, padding=0),
nn.BatchNorm2d(num_features=48),
nn.ReLU(),
# 第二层池化 (没有补零) 4 x 4
nn.MaxPool2d(kernel_size=3, stride=2, padding=0, ceil_mode=False),
# 第三层卷积 3 x 3
nn.Conv2d(in_channels=48, out_channels=64, kernel_size=2, stride=1, padding=0),
nn.BatchNorm2d(num_features=64),
nn.ReLU(),
# 展平
nn.Flatten(),
# 全连接层 [batch_size, 128]
nn.Linear(in_features=3 * 3 * 64, out_features=128)
)
# 概率输出
self.cls_out = nn.Linear(in_features=128, out_features=1)
# 回归量输出
self.reg_out = nn.Linear(in_features=128, out_features=4)
def forward(self, x):
x = self.feature_extractor(x)
cls = self.cls_out(x)
reg = self.reg_out(x)
return cls, reg import torch
from torch import nn
class ONet(nn.Module):
def __init__(self):
super().__init__()
self.feature_extractor = nn.Sequential(
# 第1层卷积 48 x 48
nn.Conv2d(in_channels=3, out_channels=32, kernel_size=3, stride=1, padding=0),
nn.BatchNorm2d(num_features=32),
nn.ReLU(),
# 第1层池化 11 x 11
nn.MaxPool2d(kernel_size=3, stride=2, padding=1, ceil_mode=False),
# 第2层卷积 9 x 9
nn.Conv2d(in_channels=32, out_channels=64, kernel_size=3, stride=1, padding=0),
nn.BatchNorm2d(num_features=64),
nn.ReLU(),
# 第2层池化
nn.MaxPool2d(kernel_size=3, stride=2, padding=0, ceil_mode=False),
# 第3层卷积
nn.Conv2d(in_channels=64, out_channels=64, kernel_size=3, stride=1, padding=0),
nn.BatchNorm2d(num_features=64),
nn.ReLU(),
# 第3层池化
nn.MaxPool2d(kernel_size=2, stride=2, padding=0, ceil_mode=False),
# 第4层卷积
nn.Conv2d(in_channels=64, out_channels=128, kernel_size=2, stride=1, padding=0),
nn.BatchNorm2d(num_features=128),
nn.ReLU(),
# 展平 [batch_size, n_features]
nn.Flatten(),
# 全连接 [batch_size, 128]
nn.Linear(in_features=3 * 3 * 128, out_features=256)
)
# 概率输出
self.cls_out = nn.Linear(in_features=256, out_features=1)
# 回归量输出
self.reg_out = nn.Linear(in_features=256, out_features=4)
# 关键点输出
self.landmark_out = nn.Linear(in_features=256, out_features=10)
def forward(self, x):
x = self.feature_extractor(x)
cls = self.cls_out(x)
reg = self.reg_out(x)
landmark = self.landmark_out(x)
return cls, reg, landmarkMTCNN训练逻辑
准备训练数据集
首先,我们需要准备人脸标注好的数据集,人脸识别标注好的数据集比较有名是:WIDEERFACE和CelebA。
本次我们使用CelebA数据集。
CelebA数据集简介
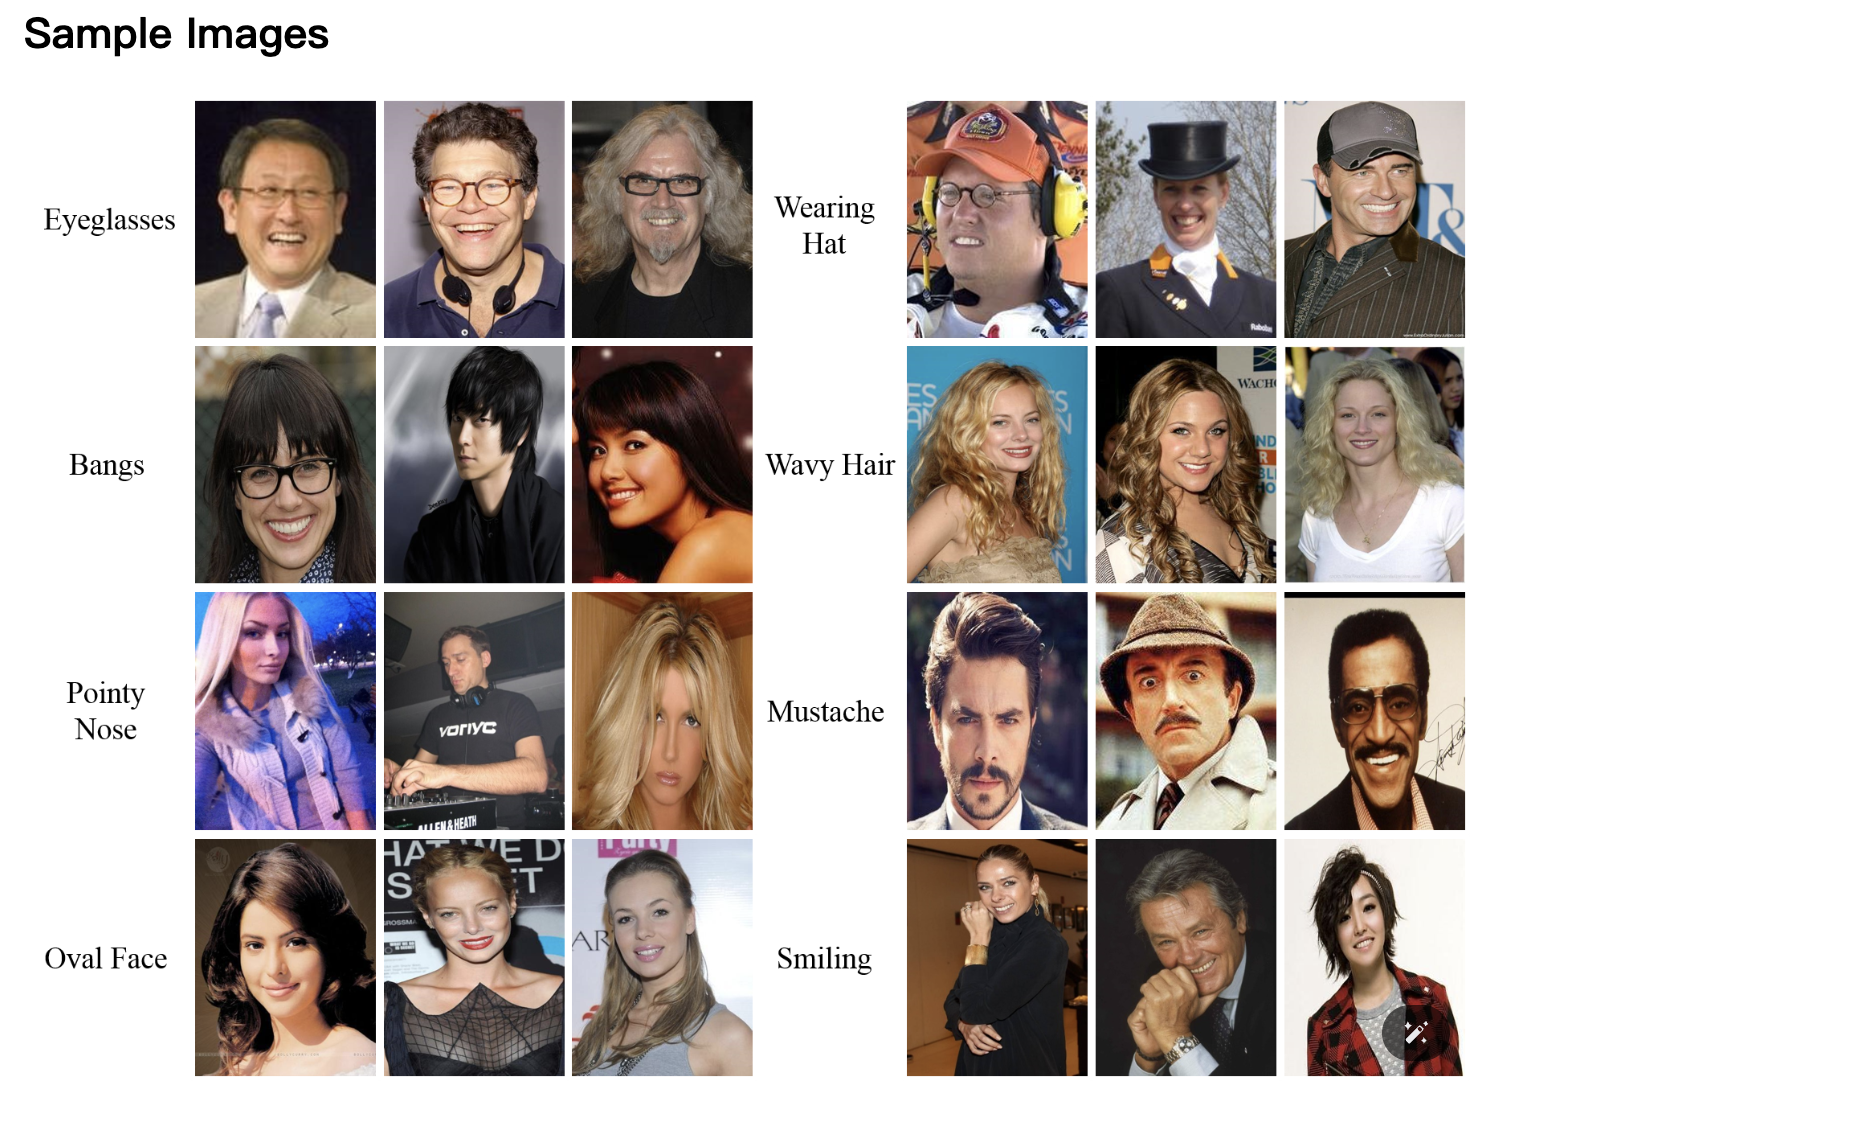
CelebA数据集是由香港中文大学多媒体实验室发布的大规模人脸属性数据集,包含超过 20 万张名人图像,每张图像有 40 个属性注释。CelebA数据集全拼是Large-scale CelebFaces Attributes (CelebA) Dataset。 该数据集中的图像涵盖了丰富的人体姿势变化和复杂多样的背景信息。涵盖了分类、目标检测和关键点检测等数据。
CelebA数据集下载
下载地址:
- 可以在CelebA官网找到谷歌网盘下载链接或百度网盘下载链接。
下载和准备训练集
第一步:下载文件后解压,解压后目录结构如下
CelebA
  |-Anno
    |-identity_CelebA.txt # 图片标注的身份信息
    |-list_attr_celeba.txt # 图片标注的属性信息
    |-list_bbox_celeba.txt # 图片标注的人脸框
    |-list_landmarks_align_celeba.txt # 图片标注的人脸关键点(对齐图片)
    |-list_landmarks_celeba.txt # 图片标注的人脸关键点
  |-Eval
    |-list_eval_partition.txt # 图片划分训练集、验证集、测试集
  |-Img
    |-img_align_celeba # 图片经过对齐后的
    |-img_celeba # 原始图片(未做对齐处理)
    |-img_celeba_png # PNG格式的图片
第二步:将所需的图片以及标准信息拷贝到代码工程项目下,并调整目录结构如下:
代码根目录
  |-datasets
    |-celeba
      |-identity_CelebA.txt
      |-list_attr_celeba.txt
      |-list_bbox_celeba.txt
      |-list_landmarks_align_celeba.txt
      |-list_landmarks_celeba.txt
      |-Img
        |-img_celeba
  |-*.py 代码文件
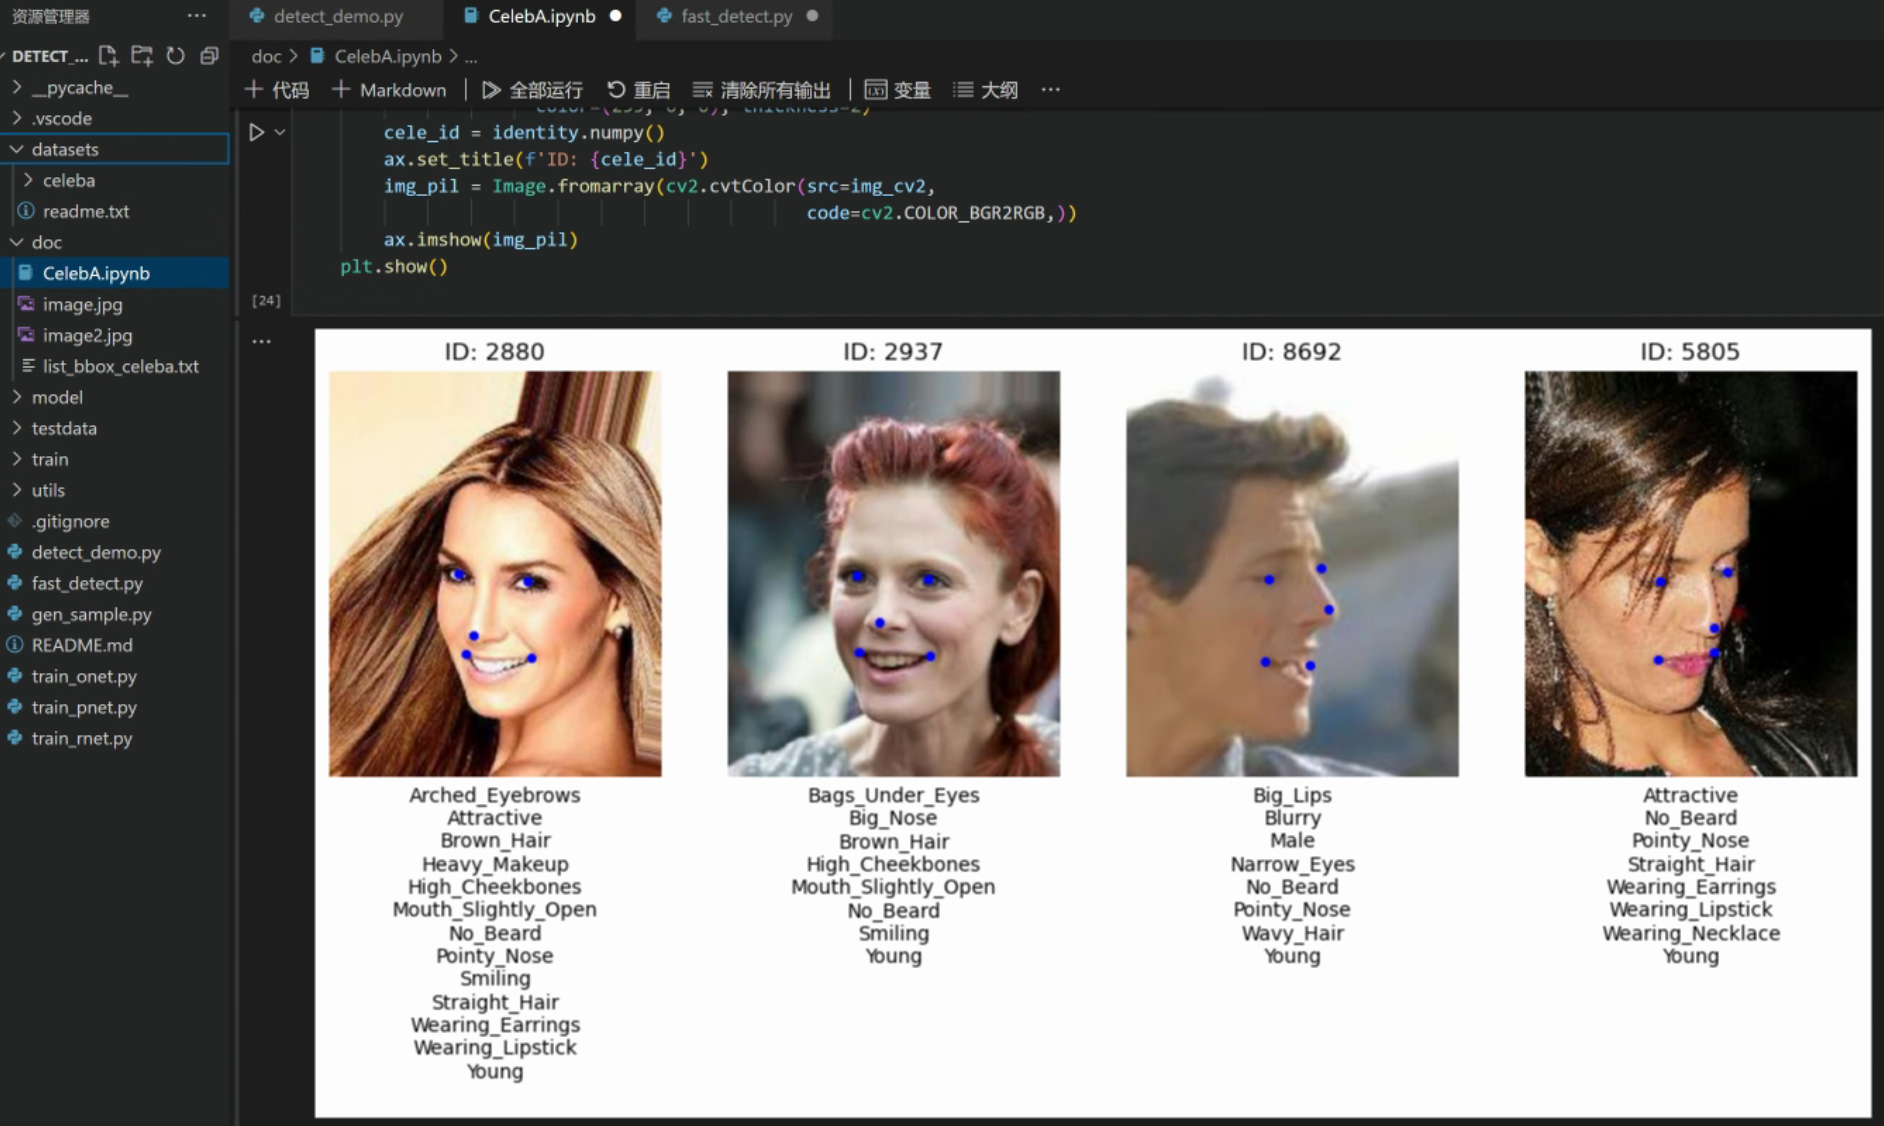
说明:在使用数据集时可以调整成如下的目录结构,这样我们可以在Jupyter Notebook中使用CelebA的API查看图片的信息。
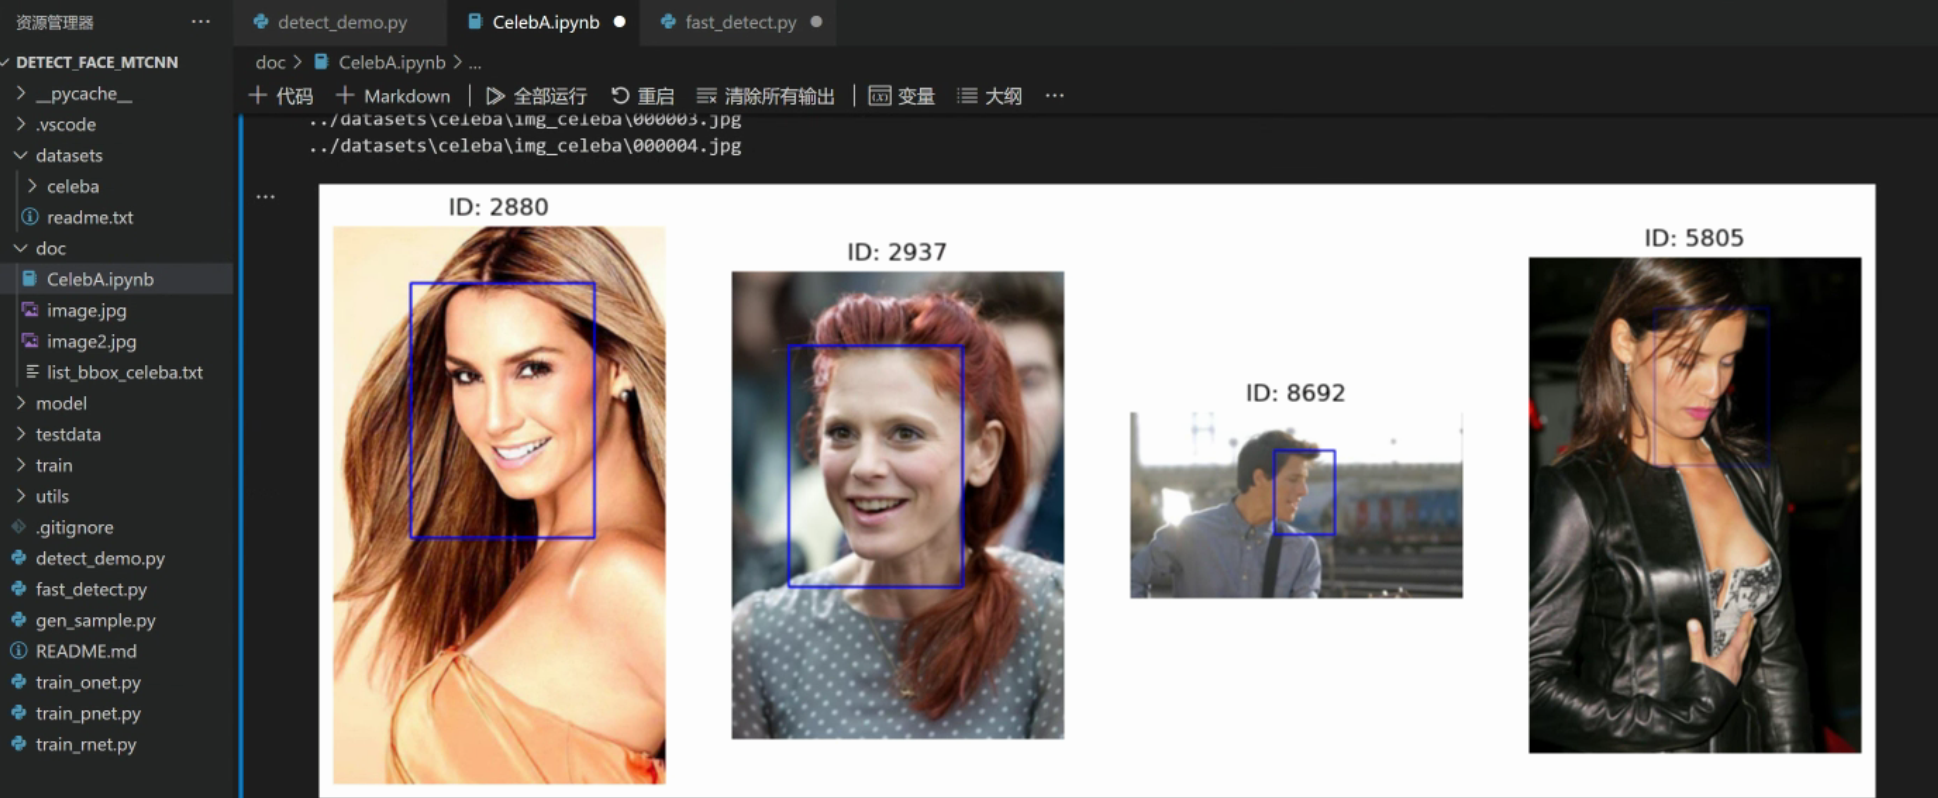
第三步:使用CelebA的API查看图片的信息。
import numpy as np
from torchvision.datasets import CelebA
import matplotlib.pyplot as plt
import cv2
from PIL import Image

root_dir = 'datasets'   # jupyter notebook的文件放在与datasets同一级目录下
celeba = CelebA(root=root_dir, split='train',
                target_type=['attr', 'identity', 'bbox', 'landmarks'],
                download=False)
attr_names = celeba.attr_names
attr_names.pop()
attr_names = np.array(attr_names)
fig = plt.figure(figsize=(14, 7))

n = 4 # 显示的图片数量
for idx in range(n):
    img, (attr, identity, bbox, landmarks) = celeba[idx]  # 读取图片和相关标签值
    ax = fig.add_subplot(1, 4, idx + 1)
    # 不显示刻度标签和边框
    ax.set_xticks([])
    ax.set_yticks([])
    ax.set_frame_on(b=False)

    # 将CelebA数据集读取到的PIL图片格式转换成OprnCV所需格式
    img_cv2 = cv2.cvtColor(src=np.asanyarray(img), code=cv2.COLOR_RGB2BGR)

    # 绘制特征点
    landmarks = landmarks.numpy()
    for idx, point in enumerate(landmarks):
        if idx % 2 == 0:
            cv2.circle(img=img_cv2, center=(point, landmarks[idx + 1]),
                        radius=1, color=(255, 0, 0), thickness=2)
    attr_list = attr.numpy()
    attrs = attr_names[attr_list==1]
    label = ''
    # 属性标签
    for att in attrs:
        label = label + att + '\n'
    ax.set_xlabel(label)
    # 身份ID
    cele_id = identity.numpy()
    ax.set_title(f'ID: {cele_id}')
    # 将OpenCV图片再次转成成Pillow图片格式
    img_pil = Image.fromarray( cv2.cvtColor(src=img_cv2,
                                            code=cv2.COLOR_BGR2RGB,))
    ax.imshow(img_pil)
plt.show()
# 显示标注框
fig = plt.figure(figsize=(14, 7))
for idx in range(n):
    img, (attr, identity, bbox, landmarks) = celeba[idx]
    ax = fig.add_subplot(1, 4, idx + 1)
    ax.set_xticks([])
    ax.set_yticks([])
    ax.set_frame_on(b=False)

    # 图片的读取改为使用原图像
    file_path = os.path.join(celeba.root, celeba.base_folder, 'img_celeba', celeba.filename[idx])

    img_cv2 = cv2.imread(file_path)
    bbox = bbox.numpy()
    cv2.rectangle(img=img_cv2, pt1=(bbox[0], bbox[1]),
                  pt2=(bbox[0] + bbox[2], bbox[1] + bbox[3]),
                  color=(255, 0, 0), thickness=2)
    cele_id = identity.numpy()
    ax.set_title(f'ID: {cele_id}')
    img_pil = Image.fromarray(cv2.cvtColor(src=img_cv2,
                                           code=cv2.COLOR_BGR2RGB,))
    ax.imshow(img_pil)
plt.show()
训练集预处理
因为图片标注的信息各种各样,不能直接灌入模型中训练,所以需要进行预处理。
传给机器的数据最好是以0为中心的,且归一化到[-1, 1]之间的数据。
预处理过程大致如下:
- 在datasets目录下创建train/12、train/24、train/48文件夹,分别存放12、24、48大小的训练数据。
- 读取标注信息和关键点信息
- 读取图片
- 根据图片的信息,随机生成5个候选裁剪框
- 对候选裁剪框与原始标注框进行IOU计算
- 如果iou>0.7,为正样本;如果0.4 < iou < 0.6,为偏样本;如果iou<0.4,为负样本
- 将生成的样本按类保存在train/12/、train/24/、train/48/文件夹中。
由于MTCNN原始项目代码可读性不强,我对预处理过程进行了重构,预处理的代码如下。以下代码也可以可以查看Github仓库:Github:detect_face_mtcnn
import os
import random
import numpy as np
import torch
from PIL import Image
from utils.tool import iou as IOU

current_path = os.path.dirname(os.path.abspath(__file__))
BASE_PATH = os.path.join(current_path, "datasets")
TARGET_PATH = os.path.join(BASE_PATH, "celeba")
IMG_PATH = os.path.join(BASE_PATH, "celeba/img_celeba")
DST_PATH = os.path.join(BASE_PATH, "train")
LABEL_PATH = os.path.join(TARGET_PATH, "list_bbox_celeba.txt")
LANMARKS_PATH = os.path.join(TARGET_PATH, "list_landmarks_celeba.txt")

# 测试样本个数限制,设置为 -1 表示全部
TEST_SAMPLE_LIMIT = 100

# 为随机数种子做准备,使正样本,部分样本,负样本的比例为1:1:3
float_num = [0.1, 0.1, 0.3, 0.5, 0.95, 0.95, 0.99, 0.99, 0.99, 0.99]

def create_directories(base_path, face_size):
    paths = {}
    base_path = os.path.join(base_path, f"{face_size}")
    if not os.path.exists(base_path):
        os.makedirs(base_path)

    paths['positive'] = os.path.join(base_path, "positive")
    paths['negative'] = os.path.join(base_path, "negative")
    paths['part'] = os.path.join(base_path, "part")

    for path in paths.values():
        if not os.path.exists(path):
            os.makedirs(path)

    return paths, base_path

def open_label_files(base_path):
    files = {}
    files['positive'] = open(os.path.join(base_path, "positive.txt"), "w")
    files['negative'] = open(os.path.join(base_path, "negative.txt"), "w")
    files['part'] = open(os.path.join(base_path, "part.txt"), "w")
    return files

def parse_annotation_line(line):
    strs = line.strip().split()
    return strs

def adjust_bbox(x1, y1, w, h):
    # 标注不标准,给框适当的偏移量
    x1 = int(x1 + w * 0.12)
    y1 = int(y1 + h * 0.1)

    x2 = int(x1 + w * 0.9)
    y2 = int(y1 + h * 0.85)

    w = int(x2 - x1)
    h = int(y2 - y1)

    return x1, y1, x2, y2, w, h

def generate_crop_boxes(cx, cy, max_side, img_w, img_h):
    """
    根据给定的人脸中心点坐标和尺寸,生成5个候选的裁剪框。

    参数:
    cx (float): 人脸中心点的 x 坐标
    cy (float): 人脸中心点的 y 坐标
    max_side (int): 人脸框的最大边长
    img_w (int): 图像宽度
    img_h (int): 图像高度

    返回:
    crop_boxes (list): 一个包含5个裁剪框坐标的列表,每个裁剪框的格式为 [x1, y1, x2, y2]
    """

    crop_boxes = []
    for _ in range(5):
        # 随机偏移中心点坐标以及边长
        seed = float_num[np.random.randint(0, len(float_num))]

        # 最大边长随机偏移
        _max_side = max_side + np.random.randint(int(-max_side * seed), int(max_side * seed))

        # 中心点x坐标随机偏移
        _cx = cx + np.random.randint(int(-cx * seed), int(cx * seed))

        # 中心点y坐标随机偏移
        _cy = cy + np.random.randint(int(-cy * seed), int(cy * seed))

        # 得到偏移后的坐标值(方框)
        _x1 = _cx - _max_side / 2
        _y1 = _cy - _max_side / 2
        _x2 = _x1 + _max_side
        _y2 = _y1 + _max_side

        # 偏移过大,偏出图像了,此时,不能用,应该再次尝试偏移
        if _x1 < 0 or _y1 < 0 or _x2 > img_w or _y2 > img_h:
            continue

        # 添加裁剪框坐标到列表中
        crop_boxes.append(np.array([_x1, _y1, _x2, _y2]))

    return crop_boxes

def process_crop_box(img, face_size, max_side, crop_box, boxes, landmarks):
    """
    处理单个裁剪框,生成正负样本。

    参数:
    img (Image): 原始图像
    crop_box (list): 裁剪框坐标 [x1, y1, x2, y2]
    boxes (list): 人脸框坐标列表
    face_size (int): 生成的人脸图像尺寸

    返回:
    sample (dict): 样本信息 {'image': image, 'label': label, 'bbox_offsets': offsets, 'landmark_offsets': landmark_offsets}
    """
    x1, y1, x2, y2 = boxes[0][:4]
    _x1, _y1, _x2, _y2 = crop_box[:4]
    px1, py1, px2, py2, px3, py3, px4, py4, px5, py5 = landmarks
    _max_side = max_side

    offset_x1 = (x1 - _x1) / _max_side
    offset_y1 = (y1 - _y1) / _max_side
    offset_x2 = (x2 - _x2) / _max_side
    offset_y2 = (y2 - _y2) / _max_side

    offset_px1 = (px1 - _x1) / _max_side
    offset_py1 = (py1 - _y1) / _max_side
    offset_px2 = (px2 - _x1) / _max_side
    offset_py2 = (py2 - _y1) / _max_side
    offset_px3 = (px3 - _x1) / _max_side
    offset_py3 = (py3 - _y1) / _max_side
    offset_px4 = (px4 - _x1) / _max_side
    offset_py4 = (py4 - _y1) / _max_side
    offset_px5 = (px5 - _x1) / _max_side
    offset_py5 = (py5 - _y1) / _max_side

    face_crop = img.crop(crop_box)
    face_resize = face_crop.resize((face_size, face_size), Image.Resampling.LANCZOS)

    iou = IOU(torch.tensor([x1, y1, x2, y2]), torch.tensor([crop_box[:4]]))

    if iou > 0.7:  # 正样本
        label = 1
    elif 0.4 < iou < 0.6:  # 部分样本
        label = 2
    elif iou < 0.2:  # 负样本
        label = 0
    else:
        return None  # 不符合任何条件的样本不处理

    return {
        'image': face_resize,
        'label': label,
        'bbox_offsets': (offset_x1, offset_y1, offset_x2, offset_y2),
        'landmark_offsets': (offset_px1, offset_py1, offset_px2, offset_py2, offset_px3, offset_py3, offset_px4, offset_py4, offset_px5, offset_py5)
    }
def process_annotation(face_size, anno_line, landmarks):
    """
    处理单行注释信息,生成正负样本。

    参数:
    anno_line (str): 一行注释信息,格式为 "image_filename x1 y1 w h"
    face_size (int): 生成的人脸图像尺寸
    landmarks (str): 关键点标注字符串

    返回:
    samples (list): 生成的样本列表
    """
    # 5个关键点
    _landmarks = landmarks.split()

    # 使用列表解析和解包一次性获取所有关键点的坐标
    landmarks = [float(x) for x in _landmarks[1:11]]

    # 解析注释行,获取图像文件名和人脸位置信息
    strs = parse_annotation_line(anno_line)
    image_filename = strs[0].strip()
    x1, y1, w, h = map(int, strs[1:])

    # 标签矫正
    x1, y1, x2, y2, w, h = adjust_bbox(x1, y1, w, h)
    boxes = [[x1, y1, x2, y2]]

    # 计算人脸中心点坐标
    cx = w / 2 + x1
    cy = h / 2 + y1

    # 最大边长
    max_side = max(w, h)

    # 打开图像文件
    image_filepath = os.path.join(IMG_PATH, image_filename)
    with Image.open(image_filepath) as img:
        # 解析出宽度和高度
        img_w, img_h = img.size
        # 生成候选的裁剪框
        samples = []
        for crop_box in generate_crop_boxes(cx, cy, max_side, img_w, img_h):
            # 处理每个候选裁剪框,生成正负样本
            sample = process_crop_box(img, face_size, max_side, crop_box, boxes, landmarks )
            if sample:
                samples.append(sample)

    return samples

def save_samples(samples, files, base_path, counters):
    """
    保存正负样本到文件中。

    参数:
    samples (list): 样本列表, 每个元素为一个字典, 包含 'image', 'label', 'bbox_offsets', 'landmark_offsets'
    files (dict): 包含正负样本输出文件的字典
    base_path (str): 输出文件的基础路径
    counters (dict): 样本计数器字典
    """
    for sample in samples:
        image = sample['image']
        label = sample['label']
        bbox_offsets = sample['bbox_offsets']
        landmark_offsets = sample['landmark_offsets']

        if label == 1:
            category = 'positive'
            counters['positive'] += 1
        elif label == 2:
            category = 'part'
            counters['part'] += 1
        else:
            category = 'negative'
            counters['negative'] += 1

        filename = f"{category}/{counters[category]}.jpg"
        image.save(os.path.join(base_path, filename))

        try:
            bbox_str = ' '.join(map(str, bbox_offsets))
            landmark_str = ' '.join(map(str, landmark_offsets))
            files[category].write(f"{filename} {label} {bbox_str} {landmark_str}\n")
        except IOError as e:
            print(f"Error writing to file: {e}")

def generate_samples(face_size, max_samples=-1):
    """
    生成指定大小的人脸样本,并保存到文件中。

    参数:
    face_size (int): 生成的人脸图像尺寸
    max_samples (int): 最大生成样本数量,设置为 -1 表示不限制
    """
    if not os.path.exists(DST_PATH):
        os.makedirs(DST_PATH)

    paths, base_path = create_directories(DST_PATH, face_size)
    # 新建标注文件
    files = open_label_files(base_path)

    # 样本计数
    counters = {'positive': 0, 'negative': 0, 'part': 0}

    # 读取标注信息
    with open(LANMARKS_PATH) as f:
        landmarks_list = f.readlines()
    with open(LABEL_PATH) as f:
        anno_list = f.readlines()

    for i, (anno_line, landmarks) in enumerate(zip(anno_list, landmarks_list)):
        print(f"positive:{counters['positive']}, \
                negative:{counters['negative']}, \
                part:{counters['part']}")

        # 跳过前两行
        if i < 2:
            continue

        # 如果处理了指定数量的样本,则退出循环
        if max_samples > 0 and i > max_samples:
            break

        # 处理单行标注信息,生成正负样本
        samples = process_annotation(
            face_size, anno_line, landmarks
        )

        # 保存正负样本到文件
        save_samples(
            samples,
            files, base_path, counters
        )

    for file in files.values():
        file.close()

def main():
    # 生成12×12的样本
    generate_samples(12, 1000)

    generate_samples(24, 1000)

    generate_samples(48, 1000)

if __name__ == "__main__":
    main()
通过运行上述的预处理脚本,代码会在datasets目录下创建对应的训练数据集
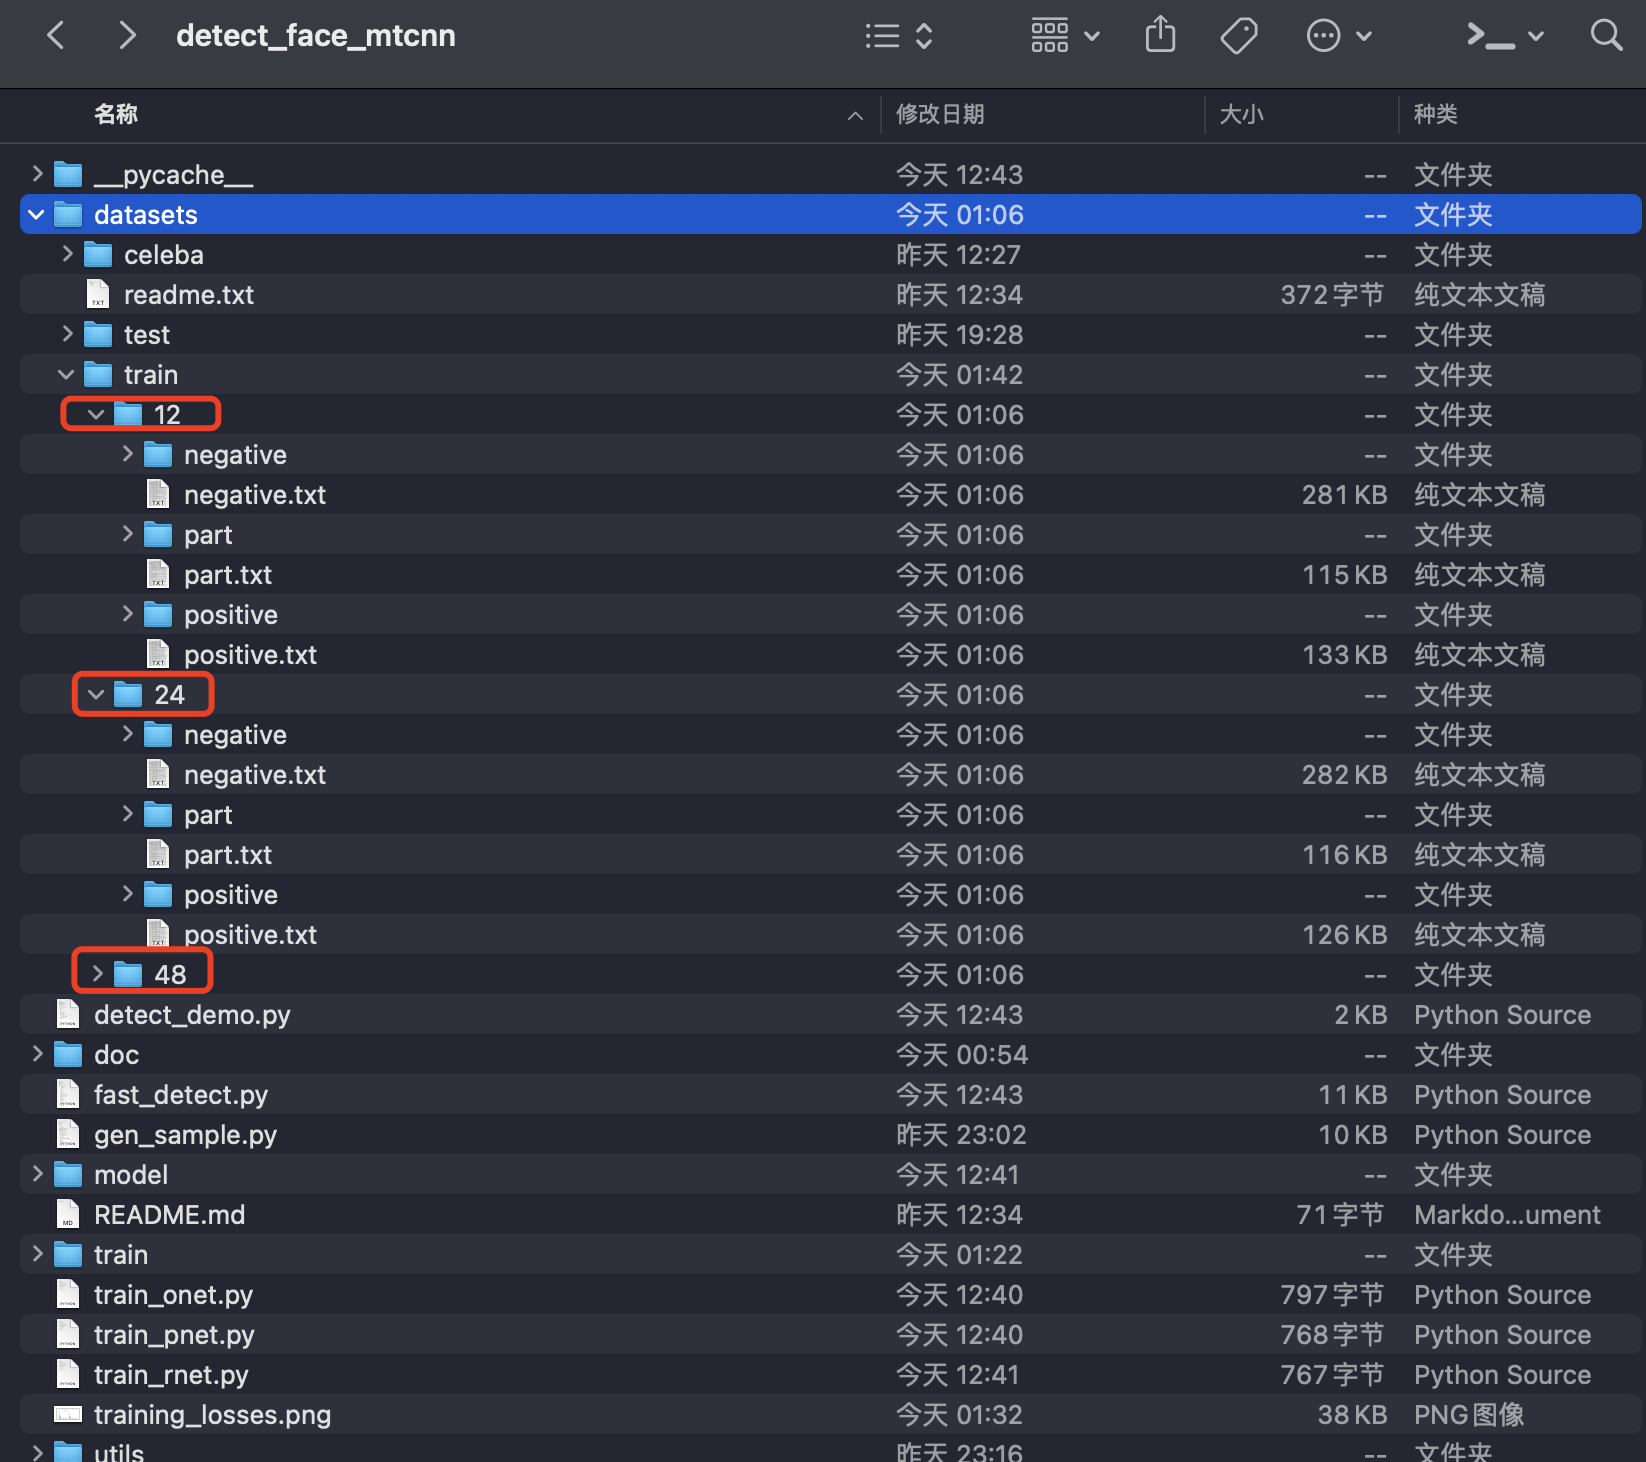
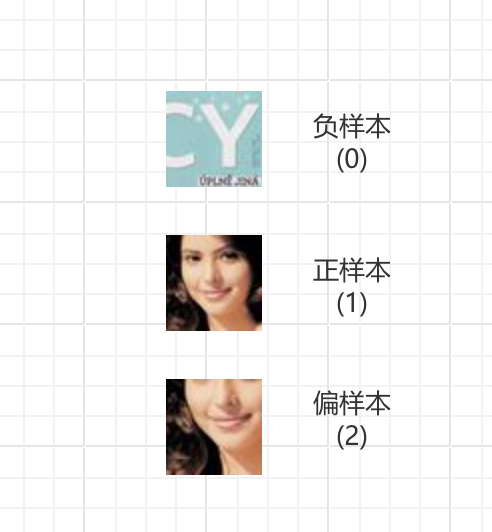
查看48 × 48的训练集,可以看到对应的正、负、偏样本如下
限于篇幅原因,以上数据集预处理部分的解析和代码理解,我将放在下篇文章进行。
三个模型分别训练
由于MTCNN是三个网络,所以需要分别对三个网络进行训练。
第一步:构建训练的公共基础部分,方便三个网络训练时调用。
import torch
import os
from torch.utils.data import DataLoader
from train.FaceDataset import FaceDataset
import matplotlib.pyplot as plt

class Trainer:
    def __init__(self, net, param_path, data_path):
        # 检测是否有GPU
        self.device = 'cuda:0' if torch.cuda.is_available() else "cpu"
        # 把模型搬到device
        self.net = net.to(self.device)

        self.param_path = param_path

        # 打包数据
        self.datasets = FaceDataset(data_path)

        # 定义损失函数:类别判断(分类任务)
        self.cls_loss_func = torch.nn.BCELoss()

        # 定义损失函数:框的偏置回归
        self.offset_loss_func = torch.nn.MSELoss()

        # 定义损失函数:关键点的偏置回归
        self.point_loss_func = torch.nn.MSELoss()

        # 定义优化器
        self.optimizer = torch.optim.Adam(params=self.net.parameters(), lr=1e-3)

    def compute_loss(self, out_cls, out_offset, out_point, cls, offset, point, landmark):
        # 选取置信度为0,1的正负样本求置信度损失
        cls_mask = torch.lt(cls, 2)
        cls_loss = self.cls_loss_func(torch.masked_select(out_cls, cls_mask),
                                      torch.masked_select(cls, cls_mask))

        # 选取正样本和部分样本求偏移率的损失
        offset_mask = torch.gt(cls, 0)
        offset_loss = self.offset_loss_func(torch.masked_select(out_offset, offset_mask),
                                            torch.masked_select(offset, offset_mask))

        if landmark:
            point_loss = self.point_loss_func(torch.masked_select(out_point, offset_mask),
                                              torch.masked_select(point, offset_mask))
            return cls_loss, offset_loss, point_loss
        else:
            return cls_loss, offset_loss, None

    def train(self, epochs, landmark=False):
        """
            - 断点续传 --> 短点续训
            - transfer learning 迁移学习
            - pretrained model 预训练

        :param epochs: 训练的轮数
        :param landmark: 是否为landmark任务
        :return:
        """

        # 加载上次训练的参数
        if os.path.exists(self.param_path):
            self.net.load_state_dict(torch.load(self.param_path))
            print("加载参数文件,继续训练 ...")
        else:
            print("没有参数文件,全新训练 ...")

        # 封装数据加载器
        dataloader = DataLoader(self.datasets, batch_size=32, shuffle=True)

        # 定义列表存储损失值
        cls_losses = []
        offset_losses = []
        point_losses = []
        total_losses = []

        for epoch in range(epochs):
            # 训练一轮
            for i, (img_data, _cls, _offset, _point) in enumerate(dataloader):
                # 数据搬家 [32, 3, 12, 12]
                img_data = img_data.to(self.device)
                _cls = _cls.to(self.device)
                _offset = _offset.to(self.device)
                _point = _point.to(self.device)

                if landmark:
                    # O-Net输出三个
                    out_cls, out_offset, out_point = self.net(img_data)
                    out_point = out_point.view(-1, 10)
                else:
                    # O-Net输出两个
                    out_cls, out_offset = self.net(img_data)
                    out_point = None

                # [B, C, H, W] 转换为 [B, C]
                out_cls = out_cls.view(-1, 1)
                out_offset = out_offset.view(-1, 4)

                if landmark:
                    out_point = out_point.view(-1, 10)

                # 计算损失
                cls_loss, offset_loss, point_loss = self.compute_loss(out_cls, out_offset, out_point,
                                                                    _cls, _offset, _point, landmark)

                if landmark:
                    loss = cls_loss + offset_loss + point_loss
                else:
                    loss = cls_loss + offset_loss

                # 打印损失
                if landmark:
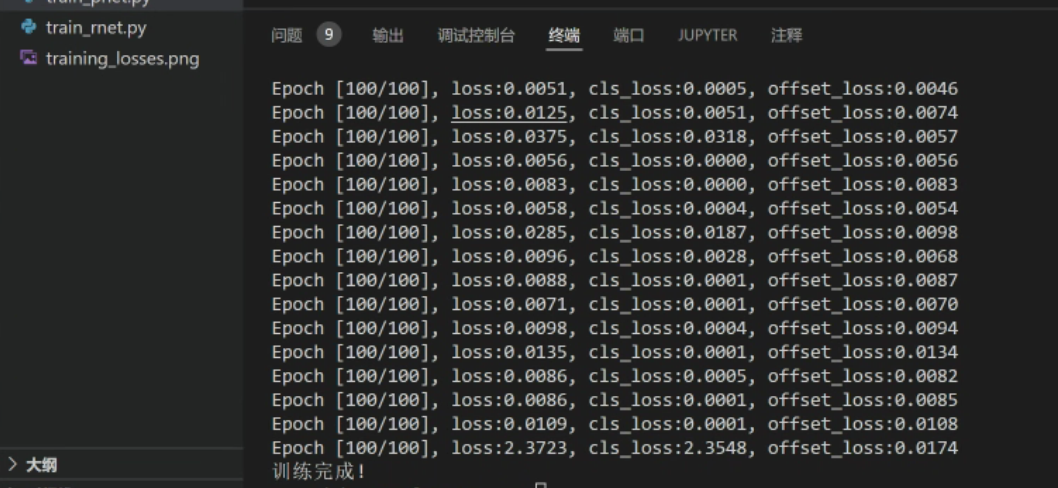
                    print(f"Epoch [{epoch+1}/{epochs}], loss:{loss.item():.4f}, cls_loss:{cls_loss.item():.4f}, "
                        f"offset_loss:{offset_loss.item():.4f}, point_loss:{point_loss.item():.4f}")
                else:
                    print(f"Epoch [{epoch+1}/{epochs}], loss:{loss.item():.4f}, cls_loss:{cls_loss.item():.4f}, "
                        f"offset_loss:{offset_loss.item():.4f}")

                # 存储损失值
                cls_losses.append(cls_loss.item())
                offset_losses.append(offset_loss.item())
                if landmark:
                    point_losses.append(point_loss.item())
                total_losses.append(loss.item())

                # 清空梯度
                self.optimizer.zero_grad()

                # 梯度回传
                loss.backward()

                # 优化
                self.optimizer.step()

            # 保存模型(参数)
            torch.save(self.net.state_dict(), self.param_path)

        # 绘制损失曲线
        self.plot_losses(cls_losses, offset_losses, point_losses, total_losses, landmark)

        print("训练完成!")

    def plot_losses(self, cls_losses, offset_losses, point_losses, total_losses, landmark):
        """
        绘制训练过程中的损失曲线
        :param cls_losses: 分类损失列表
        :param offset_losses: 边界框偏移损失列表
        :param point_losses: 关键点偏移损失列表
        :param total_losses: 总损失列表
        :param landmark: 是否为landmark任务
        """
        plt.figure(figsize=(12, 6))
        plt.subplot(1, 2, 1)
        plt.plot(cls_losses, label='Classification Loss')
        plt.plot(offset_losses, label='Offset Loss')
        if landmark:
            plt.plot(point_losses, label='Point Loss')
        plt.legend()
        plt.xlabel('Iteration')
        plt.ylabel('Loss')
        plt.title('Training Losses')

        plt.subplot(1, 2, 2)
        plt.plot(total_losses)
        plt.xlabel('Iteration')
        plt.ylabel('Total Loss')
        plt.title('Total Training Loss')

        plt.savefig('training_losses.png')
        plt.close()
第二步:训练对应的网络。
from train import model_mtcnn as nets
import os
import train.train as train

if __name__ == '__main__':

    current_path = os.path.dirname(os.path.abspath(__file__))
    # 权重存放地址
    base_path = os.path.join(current_path, "model")
    model_path = os.path.join(base_path, "p_net.pt")

    # 数据存放地址
    data_path = os.path.join(current_path, "datasets/train/12")

    # 如果没有这个参数存放目录,则创建一个目录
    if not os.path.exists(base_path):
        os.makedirs(base_path)

    # 构建模型
    pnet = nets.PNet()

    # 开始训练
    t = train.Trainer(pnet, model_path, data_path)

    # t.train2(0.01)
t.train(100)备注:以上代码在Apple M3芯片进行训练和推理时,会出现(Segmentation Fault)的错误,因此训练和预测最好是在x86架构的电脑上进行。
MTCNN推理逻辑
-
- 输入一张图片(不限尺寸)
-
- 构建图像金字塔
-
- 遍历金字塔,取出每一个级别的图像
- 3.1 把图像输入P-Net,得到P-Net的输出
- 3.2 把P-Net的输出,resize 24 × 24, 输入R-Net,得到R-Net的输出
- 3.3 把R-Net的输出,resize 48 × 48, 输入O-Net,得到O-Net的输出
篇幅原因,代码将在下一章进行分析理解,本章不再赘述。
- 遍历金字塔,取出每一个级别的图像
内容小结
- 人脸识别
- 人脸识别细分有两种:人脸检测和人脸身份识别。
- 人脸检测是识别图像或视频中的人脸,并定位其位置。
- 人脸身份识别是指通过识别人脸上的独特特征来确定一个人的身份。
- 目标检测算法都可以做人脸检测,但是太重了;而MTCNN就是这样一个轻量级和专业级的人脸检测网络。
- MTCNN
- MTCNN采用级联结构,包含三个阶段的深度卷积网络,相当于
海选→淘汰赛→决赛的过程。 - MTCNN的PNet为了能够尽可能多的识别出人脸,采用滑动窗口方式,生成图像金字塔。
- RNet采用NMS(非极大值抑制)技术,通过计算IOU(交并比),对所有候选框按照置信度进行排序,保留置信度最大的候选框。
- MTCNN的训练过程是三阶段分开训练的。
- MTCNN采用级联结构,包含三个阶段的深度卷积网络,相当于
参考资料
简书:pytorch实现人脸识别——(MTCNN+特征提取)
欢迎关注公众号以获得最新的文章和新闻

