文章目录
Toggle前言
在上一章【课程总结】day31:多模态大模型初步了解中,我们在云服务器上部署了Qwen2-VL-2B模型,初步体验了Qwen2的多模态能力,本章我们将深入了解Qwen2-VL并使用多模态对于视频的处理能力。
资料
论文标题:《Qwen2-VL: Enhancing Vision-Language Model’s Perception of the World at Any Resolution》
论文地址:https://arxiv.org/pdf/2409.12191
论文阅读理解
论文核心要点
据Qwen2-VL的论文中介绍,该模型为了进一步增强模型对视频中视觉信息的有效感知和理解能力,引入了三个关键的创新升级:
- 原始动态分辨率:该功能允许模型处理任意分辨率的图像,而不需要调整模型结构。
- 多模态旋转位置嵌入:该功能通过时间、高度、宽度三个维度来对进行embedding,从而建模了多模态输入的位置信息。
- 统一图像和视频的理解:通过混合训练方法的方式,结合图像和视频数据,确保在图像理解和视频理解方面具有专业水平。
升级点1:原始动态分辨率
模型结构
论文原文
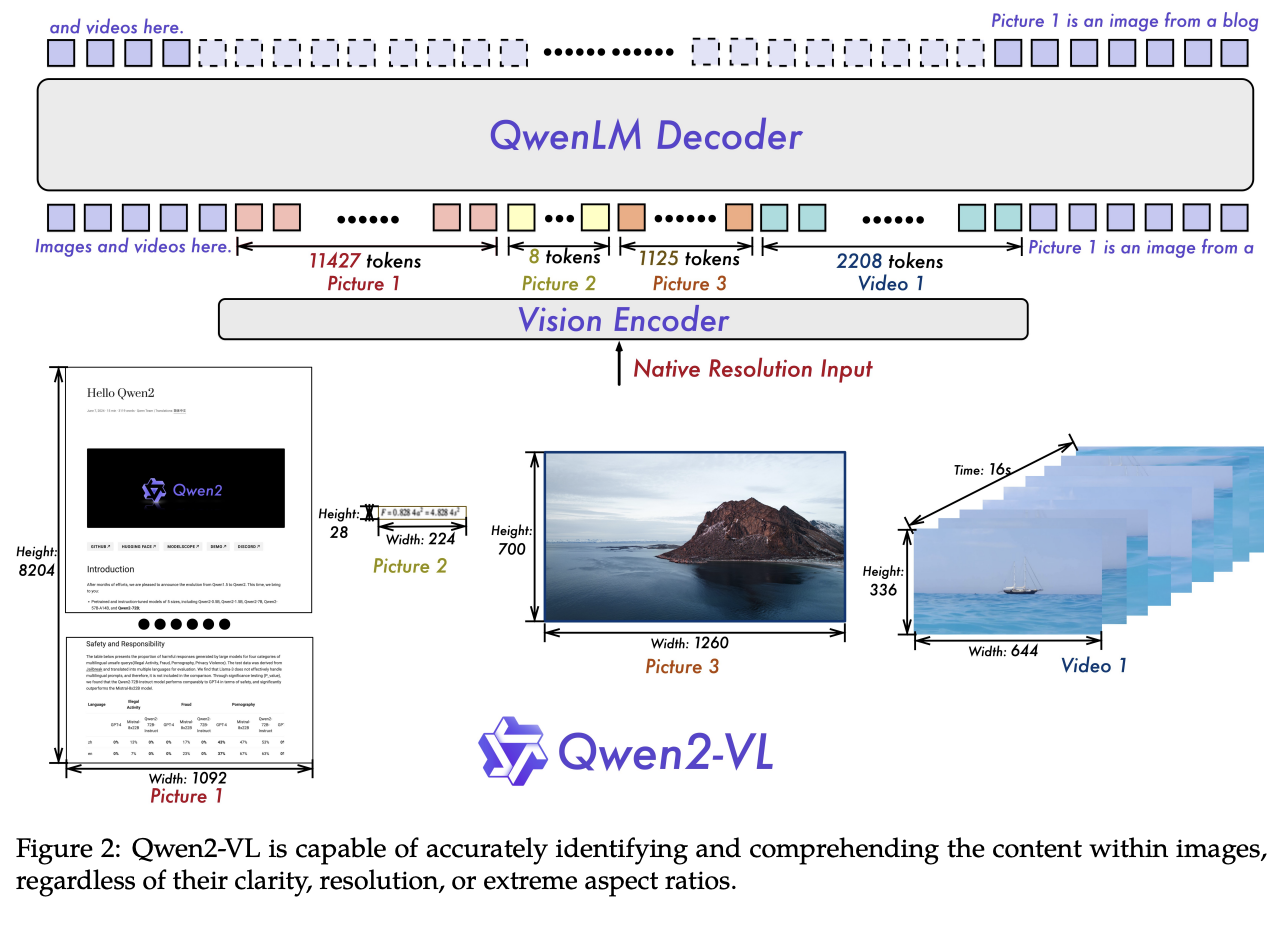
Naive Dynamic Resolution A key architectural improvement in Qwen2-VL is the introduction of naive dynamic resolution support (Dehghani et al., 2024). Unlike Qwen-VL, Qwen2-VL can now process images of any resolution, dynamically converting them into a variable number of visual tokens.1 To support this feature, we modified ViT by removing the original absolute position embeddings and introducing 2D-RoPE (Suet al., 2024; Su, 2021) to capture the two-dimensional positional information of images. At the inference stage, images of varying resolutions are packed into a single sequence, with the packed length controlled to limit GPU memory usage. Furthermore, to reduce the visual tokens of each image, a simple MLP layer is employed after the ViT to compress adjacent 2 × 2 tokens into a single token, with the special <|vision_start|> and <|vision_end|> tokens placed at the beginning and end of the compressed visual tokens. As a result, an image with a resolution of 224 × 224, encoded with a ViT using patch_size=14, will be compressed to 66 tokens before entering LLM.
论文翻译
原始动态分辨率(Naive Dynamic Resolution):
Qwen2-VL架构改进的关键之一。与它的前身不同,Qwen2-VL现在可以处理任何分辨率的图像,并且能够将它们动态转换为可变数量的视觉令牌。为了支持这一功能,我们修改了ViT,删除了原始绝对位置嵌入,并引入2D-RoPE来捕获图像的二维位置信息。在推理阶段,各种分辨率的图像被包装成单个序列,包装长度受控以限制GPU内存使用量。此外,为了减少每个图像的视觉令牌数,在ViT之后采用一个简单的MLP层,将相邻的2×2令牌压缩到一个令牌中,其中特殊的 <|vision_start|> 和 <|vision_end|> 令牌放置在压缩的视觉令牌的开始和结束处。因此,使用patch_size = 14编码的分辨率224×224的图像将在进入LLM之前被压缩为66个令牌。
论文理解
- 图像分块(Patch):
在视觉 Transformer(ViT)中,图像会被划分为多个小块(patches)。patch_size = 14意味着每个小块的尺寸为14x14像素。
- 图像分辨率:假如输入的图像分辨率为
224×224像素。 - 小块数量:
- 水平方向:
224 / 14= 16 - 垂直方向:
224 / 14= 16
因此,总的小块数量为 16 × 16 = 256 个小块。
- 水平方向:
-
压缩视觉令牌:
为了减少输入到模型中的视觉令牌数量,Qwen2-VL使用了一个简单的MLP层,将相邻的2x2个小块压缩为一个视觉令牌。
由于每个2x2的小块包含4个小块,因此256个小块被压缩为256 / 4= 64 个视觉令牌。 -
特殊令牌:
在压缩后的视觉令牌序列中,添加了两个特殊的令牌:<|vision_start|>和<|vision_end|>,用于标识视觉信息的开始和结束。
因此,最终的视觉令牌数量为64 + 2= 66 个。
升级点2:多模态旋转位置嵌入
模型结构
论文原文
Multimodal Rotary Position Embedding (M-RoPE) Another key architectural enhancement is the innovation of Multimodal Rotary Position Embedding
(M-RoPE). Unlike the traditional1D-RoPEin LLMs, which is limited to encoding one-dimensional positional information, M-RoPE effectively models the positional information of multimodal inputs. This is achieved by deconstructing the original rotary embedding into three components:temporal,height, andwidth.
For text inputs, these components utilize identical position IDs, making M-RoPE functionally equivalent to 1D-RoPE (Su, 2024).
When processing images, the temporal IDs of each visual token remain constant, while distinct IDs are assigned to the height and width components based on the token’s position in the image.
For videos, which are treated as sequences of frames, the temporal ID increments for each frame, while the height and width components follow the same ID assignment pattern as images. In scenarios where the model’s input encompasses multiple modalities, position numbering for each modality is initialized by incrementing the maximum position ID of the preceding modality by one. An illustration of M-RoPE is shown in Figure 3. M-RoPE not only enhances the modeling of positional information but also reduces the value of position IDs for images and videos, enabling the model to extrapolate to longer sequences during inference.
论文翻译
多模态旋转位置嵌入(M-RoPE):另一个关键的架构增强是多模态旋转位置嵌入 (M-RoPE) 的创新。与大型语言模型中的传统 1D-RoPE 不同,它仅限于编码一维位置信息,M-RoPE 有效地建模了多模态输入的位置信息。这通过将原始旋转嵌入分解为三个组件:
时间、高度和宽度来实现。
对于文本输入,这些组件使用相同的位移。多模态旋转位置嵌入ID,使M-RoPE功能上等同于1D-RoPE。
在处理图像时,每个视觉令牌的时间ID保持不变,而高度和宽度组件根据令牌在图像中的位置分配不同的ID。
对于视频,这些被当作帧序列来处理的视频,每帧的时间ID递增,而高度和宽度组件遵循与图像相同的ID分配模式。在模型输入包含多个模态的情况下,每个模态的位置编号通过将前一模态的最大位置ID增加一个进行初始化。图3显示了M-RoPE的示例。M-RoPE不仅增强了对位置信息的建模能力,而且降低了图像和视频中位置ID的价值,使得模型能够在推理期间扩展到更长的序列。
论文理解
-
Postion Embedding:位置嵌入是用来告诉模型输入数据中每个元素的位置。比如,在处理文本时,模型需要知道“我爱你”中的“我”是第一个词,“爱”是第二个词。
-
M-RoPE:Qwen2-VL 引入的 M-RoPE 则是一个更复杂的系统,它不仅能处理文本,还能处理图像和视频。M-RoPE 将位置嵌入分为三个部分:
- 时间:适用于视频或序列数据,表示帧的顺序。
- 高度和宽度:适用于图像,表示图像中每个视觉令牌的位置(行和列)。
-
不同数据类型的处理:
- 对于文本输入:
- 相同位移:文本中的每个词使用相同的时间位移。例如,句子中的词按顺序编号。
- 对于图像输入
固定的时间ID:图像中的每个视觉令牌(小块)保持相同的时间ID,但高度和宽度的ID会根据它们在图像中的位置不同而变化。例如,左上角的小块可能是(1,1),而右下角的小块可能是(16,16)。- 对于视频输入
递增的时间ID:视频中的每一帧都有不同的时间ID,表示它们在序列中的顺序。同时,每帧的高度和宽度组件仍然根据图像的位置分配ID。
-
模态之间的ID初始化:
当模型处理多个模态时,比如同时处理文本和图像,M-RoPE会为每个模态分配不同的起始位置ID。例如,处理图像时,图像的最大ID会在处理文本时被增加,以避免冲突。
升级点3:统一图像和视频的理解
论文原文
Unified Image and Video Understanding Qwen2-VL employs a mixed training regimen incorporating both image and video data, ensuring proficiency in image understanding and video comprehension. To preserve video information as completely as possible, we sampled each video at two frames per second. Additionally, we integrated
3D convolutions(Carreira and Zisserman, 2017) with a depth of two to process video inputs, allowing the model to handle 3D tubes instead of 2D patches, thus enabling it to process more video frames without increasing the sequence length (Arnab et al., 2021). For consistency, each image is treated as two identical frames. To balance the computational demands of long video processing with overall training efficiency, we dynamically adjust the resolution of each video frame, limiting the total number of tokens per video to 16384. This training approach strikes a balance between the model’s ability to comprehend long videos and training efficiency.
论文翻译
统一图像和视频理解:采用混合训练方法,结合图像和视频数据,确保在图像理解和视频理解方面具有专业水平。为了尽可能完整地保留视频信息,我们每秒对每个视频进行两次采样。此外,我们还集成深度为两层的
三维卷积来处理视频输入,允许模型处理三维管状结构而不是二维块,从而使其能够处理更多视频帧而无需增加序列长度。为了保持一致,每张图片都被视为两张相同的帧。为了平衡长视频处理所需的计算需求与整体训练效率,我们动态调整每个视频帧的分辨率,限制每个视频中的总令牌数量不超过 16384。这种训练方法在模型理解和训练效率之间取得了平衡。
模型部署(使用flash_attention)
在上一章【课程总结】day31:多模态大模型初步了解,我们部署了Qwen2-VL模型。
由于多模态大模型比较占用GPU显存,我们使用flash_attention来加速推理,以减少显存占用。
准备环境
第一步:启动ModelScope平台的PAI-DSW的GPU环境
# 检查CUDA的版本
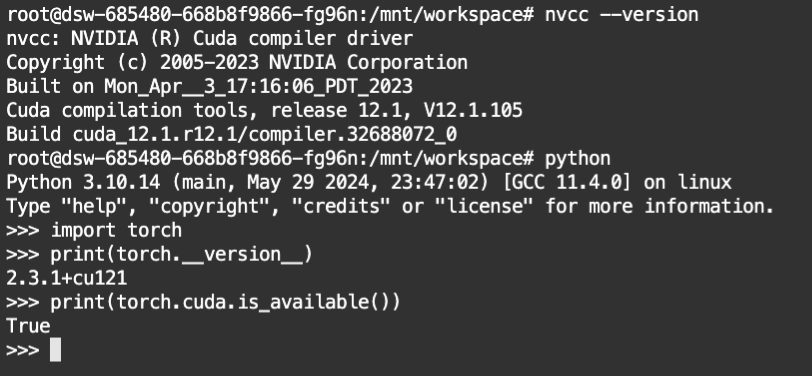
nvcc --version

# 检查pytorch版本
import torch
print(torch.__version__)
print(torch.cuda.is_available())系统版本为 CUDA 12.1 和 PyTorch 2.3.1
拉取代码
第二步:下载通义千问2-VL-2B-Instruct模型
# 确保 git lfs 已安装
git lfs install

# 下载模型
git clone https://www.modelscope.cn/Qwen/Qwen2-VL-2B-Instruct.git
安装flash_attention
第三步:安装flash_attention
pip install flash-attn引入相关库
from transformers import Qwen2VLForConditionalGeneration
from transformers import AutoTokenizer
from transformers import AutoProcessor
import torch
from qwen_vl_utils import process_vision_info
加载模型
# 设置模型路径
model_dir = "Qwen2-VL-2B-Instruct"

# 使用flash-attension加载模型
model = Qwen2VLForConditionalGeneration.from_pretrained(
    model_dir,
    torch_dtype=torch.bfloat16,
    attn_implementation="flash_attention_2",
    device_map="auto",
)模型形状
在加载模型后,如果输出 model,可以看到Qwen2的模型结构为:
Qwen2VLForConditionalGeneration(
  (visual): Qwen2VisionTransformerPretrainedModel(
    (patch_embed): PatchEmbed(
      (proj): Conv3d(3, 1280, kernel_size=(2, 14, 14), stride=(2, 14, 14), bias=False)
    )
    (rotary_pos_emb): VisionRotaryEmbedding()
    (blocks): ModuleList(
      (0-31): 32 x Qwen2VLVisionBlock(
        (norm1): LayerNorm((1280,), eps=1e-06, elementwise_affine=True)
        (norm2): LayerNorm((1280,), eps=1e-06, elementwise_affine=True)
        (attn): VisionFlashAttention2(
          (qkv): Linear(in_features=1280, out_features=3840, bias=True)
          (proj): Linear(in_features=1280, out_features=1280, bias=True)
        )
        (mlp): VisionMlp(
          (fc1): Linear(in_features=1280, out_features=5120, bias=True)
          (act): QuickGELUActivation()
          (fc2): Linear(in_features=5120, out_features=1280, bias=True)
        )
      )
    )
    (merger): PatchMerger(
      (ln_q): LayerNorm((1280,), eps=1e-06, elementwise_affine=True)
      (mlp): Sequential(
        (0): Linear(in_features=5120, out_features=5120, bias=True)
        (1): GELU(approximate='none')
        (2): Linear(in_features=5120, out_features=1536, bias=True)
      )
    )
  )
  (model): Qwen2VLModel(
    (embed_tokens): Embedding(151936, 1536)
    (layers): ModuleList(
      (0-27): 28 x Qwen2VLDecoderLayer(
        (self_attn): Qwen2VLFlashAttention2(
          (q_proj): Linear(in_features=1536, out_features=1536, bias=True)
          (k_proj): Linear(in_features=1536, out_features=256, bias=True)
          (v_proj): Linear(in_features=1536, out_features=256, bias=True)
          (o_proj): Linear(in_features=1536, out_features=1536, bias=False)
          (rotary_emb): Qwen2RotaryEmbedding()
        )
        (mlp): Qwen2MLP(
          (gate_proj): Linear(in_features=1536, out_features=8960, bias=False)
          (up_proj): Linear(in_features=1536, out_features=8960, bias=False)
          (down_proj): Linear(in_features=8960, out_features=1536, bias=False)
          (act_fn): SiLU()
        )
        (input_layernorm): Qwen2RMSNorm((1536,), eps=1e-06)
        (post_attention_layernorm): Qwen2RMSNorm((1536,), eps=1e-06)
      )
    )
    (norm): Qwen2RMSNorm((1536,), eps=1e-06)
  )
  (lm_head): Linear(in_features=1536, out_features=151936, bias=False)
)
说明:
- Qwen2-VL 模型主要由两个部分组成:视觉编码器 和 语言模型。
- 视觉编码器 (Qwen2VisionTransformerPretrainedModel):
- Patch Embedding:使用
Conv3d进行图像的embedding,切分为多个小块并提取特征。其中卷积核大小为 (2, 14, 14),步幅也为 (2, 14, 14)。 - Rotary Positional Embedding:如论文所述,进行旋转位置嵌入以增强视觉模型的感知能力。
- Transformer Blocks:包含 32 个
Qwen2VLVisionBlock,每个块都有两个Layer Normalization层和一个注意力机制,注意力机制采用Linear层进行QKV(查询、键、值)映射。 - Patch Merger:对提取的特征进行合并,使用
LayerNorm和MLP(多层感知机)处理。
- Patch Embedding:使用
- 语言模型 (Qwen2VLModel):
- Token Embedding:使用
Embedding层将输入的文本token转换为稠密向量,维度为 1536。 - Decoder Layers:包含 28 个
Qwen2VLDecoderLayer,每层具有自注意力机制和 MLP;自注意力机制(Qwen2VLFlashAttention2)通过 Q、K、V 的线性映射进行注意力计算,采用旋转嵌入增强序列信息。 - Norm Layer:使用
Qwen2RMSNorm进行归一化,帮助模型在训练过程中保持稳定性。
- Token Embedding:使用
- 输出层 (lm_head):
- 最后通过一个线性层将模型的输出映射回词汇表大小(151936),用于生成文本。
加载processor
processor = AutoProcessor.from_pretrained(model_dir)processor配置
打印processor可以得到如下信息:
Qwen2VLProcessor:
- image_processor: Qwen2VLImageProcessor {
  "do_convert_rgb": true,
  "do_normalize": true,
  "do_rescale": true,
  "do_resize": true,
  "image_mean": [
    0.48145466,
    0.4578275,
    0.40821073
  ],
  "image_processor_type": "Qwen2VLImageProcessor",
  "image_std": [
    0.26862954,
    0.26130258,
    0.27577711
  ],
  "max_pixels": 12845056,
  "merge_size": 2,
  "min_pixels": 3136,
  "patch_size": 14,
  "processor_class": "Qwen2VLProcessor",
  "resample": 3,
  "rescale_factor": 0.00392156862745098,
  "size": {
    "max_pixels": 12845056,
    "min_pixels": 3136
  },
  "temporal_patch_size": 2
}

- tokenizer: Qwen2TokenizerFast(name_or_path='Qwen2-VL-2B-Instruct', vocab_size=151643, model_max_length=32768, is_fast=True, padding_side='left', truncation_side='right', special_tokens={'eos_token': '<|im_end|>', 'pad_token': '<|endoftext|>', 'additional_special_tokens': ['<|im_start|>', '<|im_end|>', '<|object_ref_start|>', '<|object_ref_end|>', '<|box_start|>', '<|box_end|>', '<|quad_start|>', '<|quad_end|>', '<|vision_start|>', '<|vision_end|>', '<|vision_pad|>', '<|image_pad|>', '<|video_pad|>']}, clean_up_tokenization_spaces=False),  added_tokens_decoder={
    151643: AddedToken("<|endoftext|>", rstrip=False, lstrip=False, single_word=False, normalized=False, special=True),
    151644: AddedToken("<|im_start|>", rstrip=False, lstrip=False, single_word=False, normalized=False, special=True),
    151645: AddedToken("<|im_end|>", rstrip=False, lstrip=False, single_word=False, normalized=False, special=True),
    151646: AddedToken("<|object_ref_start|>", rstrip=False, lstrip=False, single_word=False, normalized=False, special=True),
    151647: AddedToken("<|object_ref_end|>", rstrip=False, lstrip=False, single_word=False, normalized=False, special=True),
    151648: AddedToken("<|box_start|>", rstrip=False, lstrip=False, single_word=False, normalized=False, special=True),
    151649: AddedToken("<|box_end|>", rstrip=False, lstrip=False, single_word=False, normalized=False, special=True),
    151650: AddedToken("<|quad_start|>", rstrip=False, lstrip=False, single_word=False, normalized=False, special=True),
    151651: AddedToken("<|quad_end|>", rstrip=False, lstrip=False, single_word=False, normalized=False, special=True),
    151652: AddedToken("<|vision_start|>", rstrip=False, lstrip=False, single_word=False, normalized=False, special=True),
    151653: AddedToken("<|vision_end|>", rstrip=False, lstrip=False, single_word=False, normalized=False, special=True),
    151654: AddedToken("<|vision_pad|>", rstrip=False, lstrip=False, single_word=False, normalized=False, special=True),
    151655: AddedToken("<|image_pad|>", rstrip=False, lstrip=False, single_word=False, normalized=False, special=True),
    151656: AddedToken("<|video_pad|>", rstrip=False, lstrip=False, single_word=False, normalized=False, special=True),
}

{
  "chat_template": "{% set image_count = namespace(value=0) %}{% set video_count = namespace(value=0) %}{% for message in messages %}{% if loop.first and message['role'] != 'system' %}<|im_start|>system\nYou are a helpful assistant.<|im_end|>\n{% endif %}<|im_start|>{{ message['role'] }}\n{% if message['content'] is string %}{{ message['content'] }}<|im_end|>\n{% else %}{% for content in message['content'] %}{% if content['type'] == 'image' or 'image' in content or 'image_url' in content %}{% set image_count.value = image_count.value + 1 %}{% if add_vision_id %}Picture {{ image_count.value }}: {% endif %}<|vision_start|><|image_pad|><|vision_end|>{% elif content['type'] == 'video' or 'video' in content %}{% set video_count.value = video_count.value + 1 %}{% if add_vision_id %}Video {{ video_count.value }}: {% endif %}<|vision_start|><|video_pad|><|vision_end|>{% elif 'text' in content %}{{ content['text'] }}{% endif %}{% endfor %}<|im_end|>\n{% endif %}{% endfor %}{% if add_generation_prompt %}<|im_start|>assistant\n{% endif %}",
  "processor_class": "Qwen2VLProcessor"
}
说明:
- 图像处理器 (Qwen2VLImageProcessor)
- 转换 RGB –
do_convert_rgb: 设置为 true,表示将输入图像转换为 RGB 格式,确保颜色通道的一致性。 - 归一化 –
do_normalize: 设置为 true,表示对图像进行标准化处理,以便使图像特征的均值和方差符合模型的预期。 - 重缩放 –
do_rescale: 设置为 true,表示将图像像素值缩放到 [0, 1] 的范围。 - 调整大小 –
do_resize: 设置为 true,表示将图像调整为模型所需的输入尺寸。 - 均值和标准差:
image_mean: [0.48145466, 0.4578275, 0.40821073],用于图像归一化的均值。
image_std: [0.26862954, 0.26130258, 0.27577711],用于图像归一化的标准差。 - 像素限制:
max_pixels: 12845056,表示处理的图像最大像素数。
min_pixels: 3136,表示处理的图像最小像素数。 - 补丁大小 –
patch_size: 14,表示将图像划分为补丁的大小。
- 分词器 (Qwen2TokenizerFast)
- 词汇表大小 –
vocab_size: 151643,表示分词器支持的词汇数量。 - 最大长度 –
model_max_length: 32768,表示模型能够处理的最大文本长度。 - 快速模式 –
is_fast: 设置为 True,表示使用快速分词器,以提高处理效率。 - 填充和截断:
padding_side: ‘left’,表示在文本左侧填充。truncation_side: ‘right’,表示在文本右侧截断。
- 特殊标记 –
special_tokens: 包含多个特殊标记,例如:<|vision_start|>和<|vision_end|>,用于标识图像的开始和结束。<|vision_pad|>、<|image_pad|>和<|video_pad|>表示图像补丁的填充。
构建对话模板
messages = [
    {
        "role": "user",
        "content": [
            {
                "type": "image",
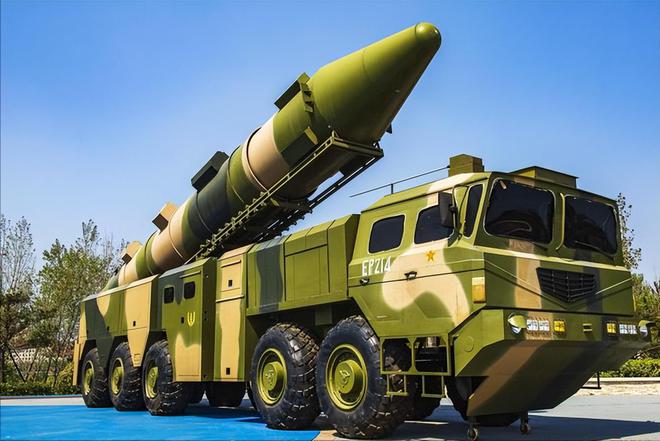
                "image": "https://17aitech.com/wp-content/uploads/2024/10/missile.jpeg",
            },
            {"type": "text", "text": "描述一下这张图片,可以的话给出具体参数型号."},
        ],
    }
]
备注:
数据预处理
text = processor.apply_chat_template(
    messages, tokenize=False, add_generation_prompt=True
)
image_inputs, video_inputs = process_vision_info(messages)
inputs = processor(
    text=[text],
    images=image_inputs,
    videos=video_inputs,
    padding=True,
    return_tensors="pt",
)
inputs = inputs.to("cuda")
说明:
- 查看text内容,其构成的对话模板内容为:
'<|im_start|>system\nYou are a helpful assistant.<|im_end|>\n<|im_start|>user\n<|vision_start|><|image_pad|><|vision_end|>描述一下这张图片,可以的话给出具体参数型号.<|im_end|>\n<|im_start|>assistant\n' - 其中
<|image_pad|>为图片的填充符,用于对齐。
模型推理
generated_ids = model.generate(**inputs, max_new_tokens=128)
generated_ids_trimmed = [
    out_ids[len(in_ids) :] for in_ids, out_ids in zip(inputs.input_ids, generated_ids)
]
output_text = processor.batch_decode(
    generated_ids_trimmed, skip_special_tokens=True, clean_up_tokenization_spaces=False
)
print(output_text)识别Gif动图
messages = [
    {
        "role": "user",
        "content": [
            {
                "type": "image",
                "image": "https://17aitech.com/wp-content/uploads/2024/09/%E6%A3%80%E7%B4%A2%E5%88%B0%E7%AD%94%E6%A1%88.gif",
            },
            {"type": "text", "text": "描述一下这张图片."},
        ],
    }
]识别视频
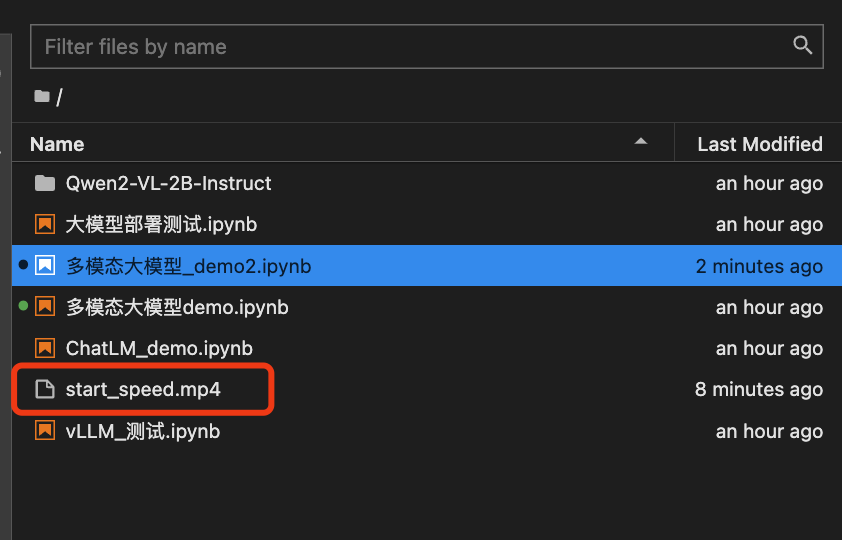
首先,我们下载一段.mp4视频到本地,下载的视频地址为好看视频
备注:我以前曾经做过一个项目,通过视频的帧数来度量软件的启动速度,我们看看大模型是否可以很容易地给出结果。
然后,修改消息内容如下:
messages = [
    {
        "role": "user",
        "content": [
            {
                "type": "video",
                "video": "file://start_speed.mp4",
                "max_pixels": 360 * 420,
                "fps": 1.0,
            },
            {"type": "text", "text": "请描述这段视频,同时计算两个手机各自从启动到显示各自的帧数并输出结果."},
        ],
    }
]可以看到,Qwen2-VL可以识别出视频中的内容,虽然没有给出各自的帧数,但是可以识别出两个手机的品牌并且给出哪个更快。
内容小结
- Qwen2-VL为了增强模型能力,主要进行了3个改进:
- 原始动态分辨率:该功能允许模型处理任意分辨率的图像,而不需要调整模型结构。
- 多模态旋转位置嵌入:该功能通过时间、高度、宽度三个维度来对进行embedding,从而建模了多模态输入的位置信息。
- 统一图像和视频的理解:通过混合训练方法的方式,结合图像和视频数据,确保在图像理解和视频理解方面具有专业水平。
- Qwen2-VL的模型结构主要由 视觉编码器 和 语言模型 两部分组成。
- Qwen2-VL可以使用flashAttention进行加速,使用时需要检查CUDA、torch版本等。
- Qwen2-VL除了可以识别图片之外,也可以识别Gif动图和视频,其能力非常强大。
参考资料
知乎:【精读】Qwen2-VL: Enhancing Vision-Language Model’s Perception of the World at Any Resolution
欢迎关注公众号以获得最新的文章和新闻


