
背景
随着AI Agent在2025年的火爆,与之相关的MCP协议也越来越受到开发者的重视,本文将结合示例深入了解MCP协议的原理架构以及应用方法。
(What)MCP协议是什么
MCP(Model Context Protocol)是一种专为AI Agent设计的标准化协议,旨在解决AI模型与外部数据、工具之间的集成难题。其核心定位是成为AI领域的“通用接口”,类似于物理世界中的USB-C标准,为不同AI系统提供安全、无缝、可扩展的数据交换能力。
(Why)为什么要使用MCP协议
MCP的作用主要有三点:
-
消除对接碎片化。
就像早期USB-C标准没有诞生之前,我们的手机、电脑设备不得不面临五花八门的插口问题,现在大模型在与各家服务商进行API调用的时候,如果没有统一的协议,那么开发者和使用者不得不面临类似的问题。通过MCP协议,开发者和AI模型可以轻松地集成,实现数据交换和交互。

-
在不同 LLM 提供商和供应商之间切换的灵活性
-
在您的基础设施中保护数据的最佳实践
备注:以上两点在MCP官网有提到,但目前接触不够,暂未有深入体会。
(How)如何实现一个MCP协议
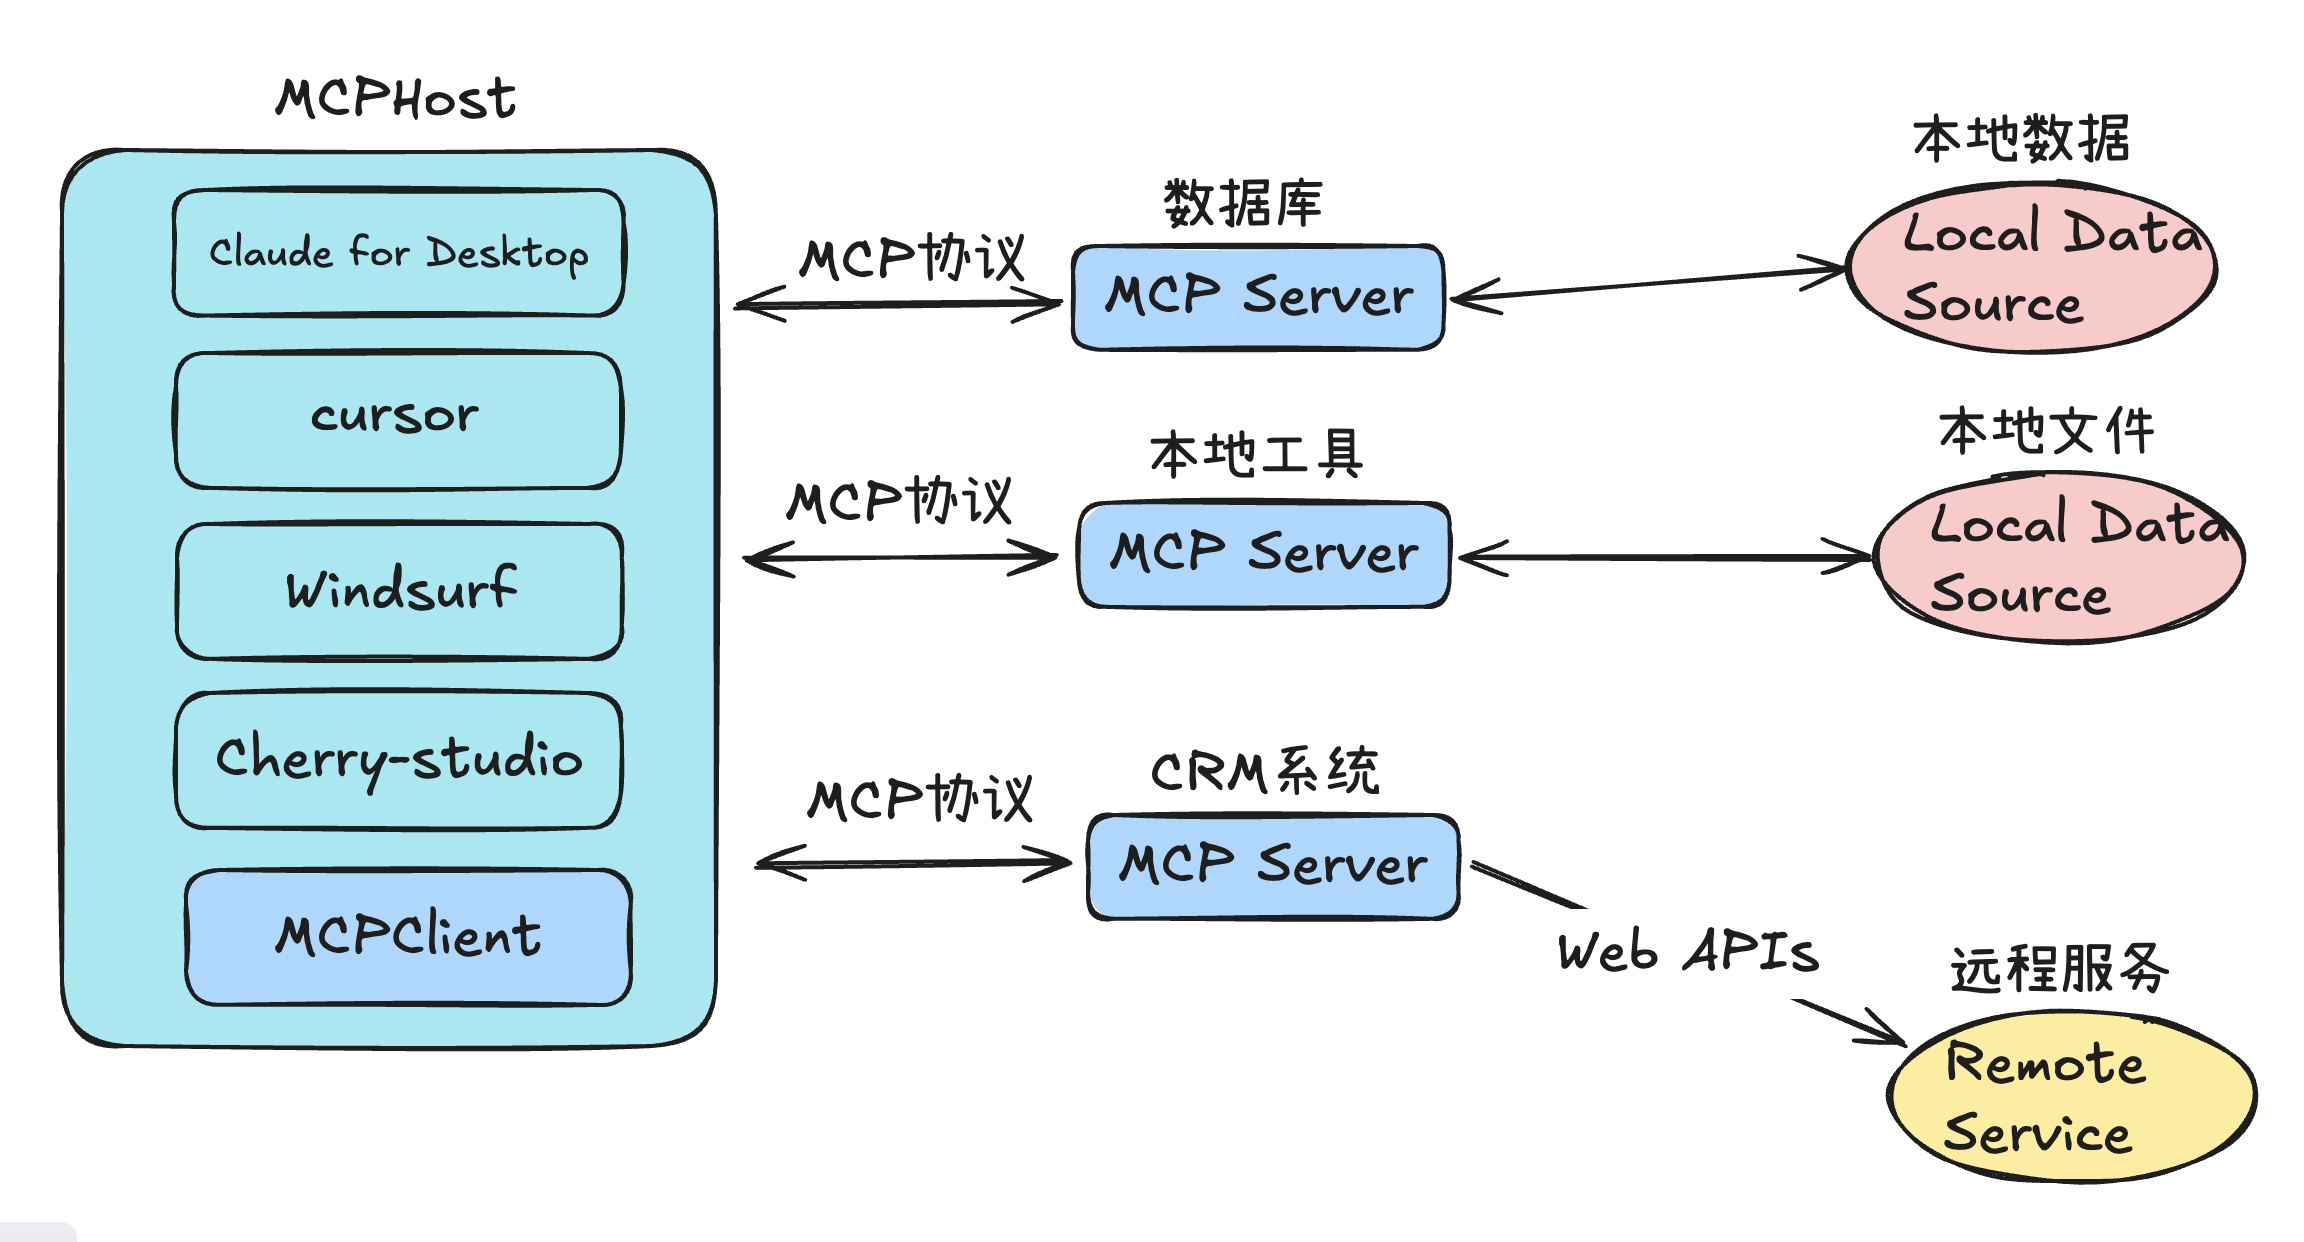
MCP协议的架构构成主要主要由5部分组成:
-
MCP主机(MCP Hosts)
如Claude Desktop、IDE 或 AI 工具等想要通过 MCP 访问数据的程序 -
MCP客户端(MCP Clients)
与服务器保持 1:1 连接的协议客户端 -
MCP服务器(MCP Servers)
通过标准化的模型上下文协议暴露特定功能的轻量级程序 -
本地数据源(Local Data Sources)
MCP 服务器可以安全访问的计算机文件、数据库和服务 -
远程服务(Remote Services)
MCP 服务器可以连接的通过互联网提供的外部系统(例如通过 API)
接下来,我们实现一个MCPServer,这个Server可以通过Web API访问远程的服务器以获取天气信息。
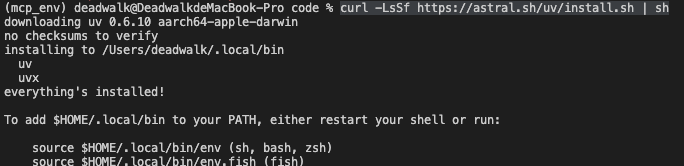
1. 准备环境:安装uv
# Mac下使用curl命令安装
curl -LsSf https://astral.sh/uv/install.sh | sh

# Window下使用PowerShell命令安装
powershell -ExecutionPolicy ByPass -c "irm https://astral.sh/uv/install.ps1 | iex"
运行结果:
备注:如果提示
url: (7) Failed to connect to github.com port 443 after 93 ms: Couldn't connect to server可能需要科学上网或者过一段时间再试。
2. 创建项目
# 为我们的项目创建一个新目录
uv init weather
cd weather

# 创建虚拟环境并激活它
uv venv
source .venv/bin/activate

# 安装依赖
uv add "mcp[cli]" httpx

# 创建我们的服务器文件
touch weather.py
运行结果:

3. 实现weather.py的代码
3.1 导入包并设置实例
from typing import Any, Dict
import httpx
from mcp.server.fastmcp import FastMCP

# 初始化FastMCP服务器
mcp = FastMCP("weather")

# 常量
BAIDU_API_BASE = "https://api.map.baidu.com/weather/v1/"
BAIDU_API_KEY = "8HkEwz5h********"
3.2 实现辅助函数
# 城市与行政区ID映射表
WEATHER_DISTRICT_ID = {
    "北京": "110100",
    "上海": "310000",
    "广州": "440100",
    "深圳": "440300",
    # 可以根据需要添加更多城市
}

async def make_baidu_request(district_id: str) -> Dict[str, Any] | None:
    """向百度天气API发出GET请求,处理错误并返回JSON响应"""
    params = {
        "district_id": district_id,
        "data_type": "now",
        "ak": BAIDU_API_KEY
    }
    async with httpx.AsyncClient() as client:
        try:
            response = await client.get(BAIDU_API_BASE, params=params, timeout=30.0)
            response.raise_for_status()
            return response.json()
        except Exception:
            return None

def format_weather(data: Dict) -> str:
    """将天气数据格式化为可读字符串"""
    location = data["result"]["location"]
    now = data["result"]["now"]
    return f"""
城市: {location['city']}
天气状况: {now['text']}
温度: {now['temp']}°C
体感温度: {now['feels_like']}°C
湿度: {now['rh']}%
风力: {now['wind_class']}
风向: {now['wind_dir']}
更新时间: {now['uptime']}
"""

def get_district_id(city: str) -> str | None:
    """根据城市名称获取对应的行政区ID"""
    return WEATHER_DISTRICT_ID.get(city)
3.3 实现工具执行
@mcp.tool()
async def get_weather(city: str) -> str:
    """获取指定城市的当前天气

    Args:
        city: 城市名称
    """
    district_id = get_district_id(city)
    if not district_id:
        return f"未找到{city}对应的行政区ID。"

    data = await make_baidu_request(district_id)

    if not data or data.get("status") != 0:
        return "无法获取天气信息。"

    return format_weather(data)
3.4 实现入口函数
if __name__ == "__main__":
    # 初始化并运行服务器
    mcp.run(transport='stdio')
完整代码
from typing import Any, Dict
import httpx
from mcp.server.fastmcp import FastMCP

# 初始化FastMCP服务器
mcp = FastMCP("weather")

# 常量
BAIDU_API_BASE = "https://api.map.baidu.com/weather/v1/"
BAIDU_API_KEY = "8HkEwz5h********"

# 城市与行政区ID映射表
WEATHER_DISTRICT_ID = {
    "北京": "110100",
    "上海": "310000",
    "广州": "440100",
    "深圳": "440300",
    # 可以根据需要添加更多城市
}

async def make_baidu_request(district_id: str) -> Dict[str, Any] | None:
    """向百度天气API发出GET请求,处理错误并返回JSON响应"""
    params = {
        "district_id": district_id,
        "data_type": "now",
        "ak": BAIDU_API_KEY
    }
    async with httpx.AsyncClient() as client:
        try:
            response = await client.get(BAIDU_API_BASE, params=params, timeout=30.0)
            response.raise_for_status()
            return response.json()
        except Exception:
            return None

def format_weather(data: Dict) -> str:
    """将天气数据格式化为可读字符串"""
    location = data["result"]["location"]
    now = data["result"]["now"]
    return f"""
城市: {location['city']}
天气状况: {now['text']}
温度: {now['temp']}°C
体感温度: {now['feels_like']}°C
湿度: {now['rh']}%
风力: {now['wind_class']}
风向: {now['wind_dir']}
更新时间: {now['uptime']}
"""

def get_district_id(city: str) -> str | None:
    """根据城市名称获取对应的行政区ID"""
    return WEATHER_DISTRICT_ID.get(city)

@mcp.tool()
async def get_weather(city: str) -> str:
    """获取指定城市的当前天气

    Args:
        city: 城市名称
    """
    district_id = get_district_id(city)
    if not district_id:
        return f"未找到{city}对应的行政区ID。"

    data = await make_baidu_request(district_id)

    if not data or data.get("status") != 0:
        return "无法获取天气信息。"

    return format_weather(data)

if __name__ == "__main__":
    # 初始化并运行服务器
    mcp.run(transport='stdio')
BAIDU_API_KEY需要访问http://lbsyun.baidu.com注册获取。
4. 启动服务器
通过 uv run weather.py 启动服务。

5. 测试服务
命令行下运行如下命令安装inspector。
npx @modelcontextprotocol/inspector运行结果:

6. 调试服务
-
安装完毕后,在浏览器中打开
http://localhost:5173/。 -
页面输入调试命令:
- command:
uv - Arguments:
--directory /Users/deadwalk/Code/ai_proj_agent/weather run weather.py
备注:
/Users/deadwalk/Code/ai_proj_agent/weather对应创建的工程目录,请根据自己的情况进行修改。
- command:
-
点击Connect按钮,确认服务可以正常连接;
-
在右侧Tools点击List Tools->Weather->输入参数"北京"->Run Tool,可以看到正常获得北京的天气情况,此时代表mcp-server-weather可以正常运行了。
运行结果:

7. 集成到其他应用中
7.1 在cherry-studio中集成服务
- 打开cherry-studio的设置->MCP服务器->编辑JSON,添加如下mcp服务设置:
{
    "mcpServers": {
        "weather": {
            "command": "/Users/deadwalk/.local/bin/uv",
            "args": [
                "--directory",
                "/Users/deadwalk/Code/ai_proj_agent/weather",
                "run",
                "weather.py"
            ]
        }
    }
}
备注:
/Users/deadwalk/.local/bin/uv对应uv可执行文件的完整路径,可以通过MacOS/Linux上运行which uv或在Windows上运行where uv来获取此路径。
- 添加成功之后,启用
weather服务和deepseek-chat模型,提问大模型:北京今天的天气是多少?
运行结果:
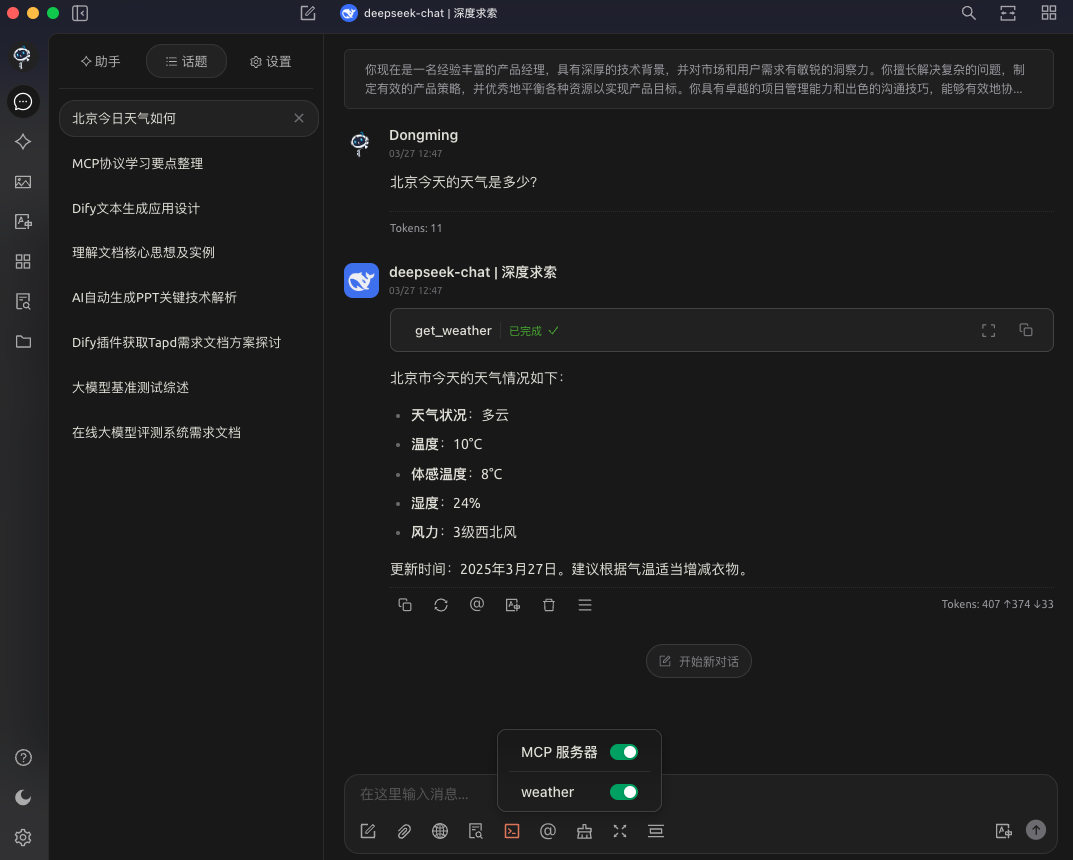
从图中可以看到,大模型调用了我们之前封装的mcp-server-weather服务,并成功获取了北京的天气。
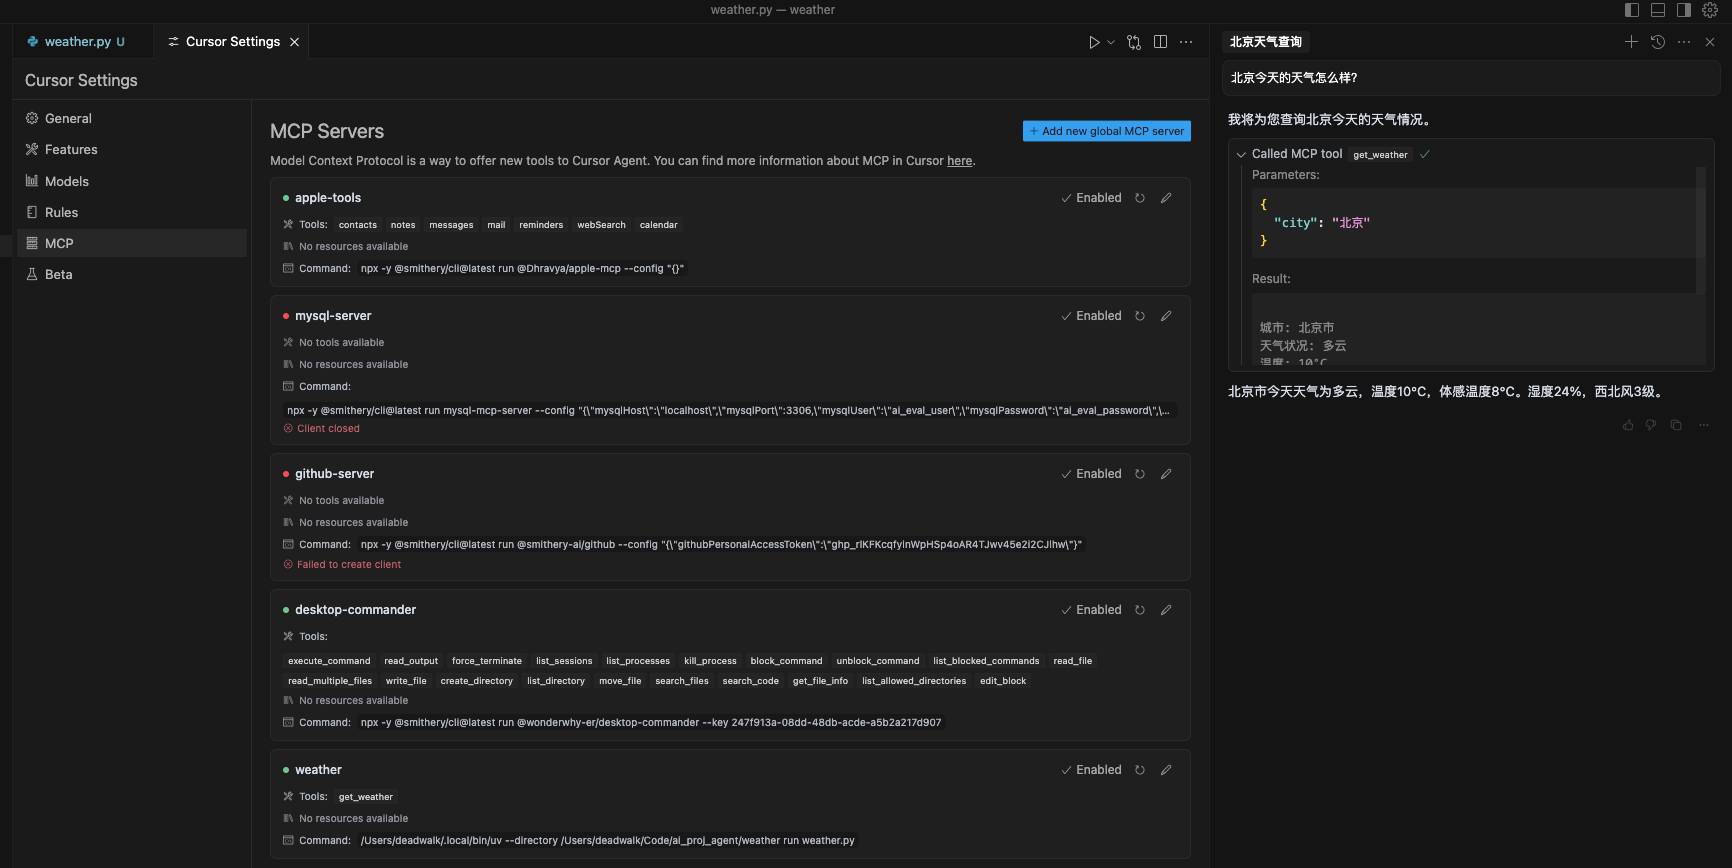
7.2 在cursor中集成服务
- 我们也可以在cursor中添加对应的服务
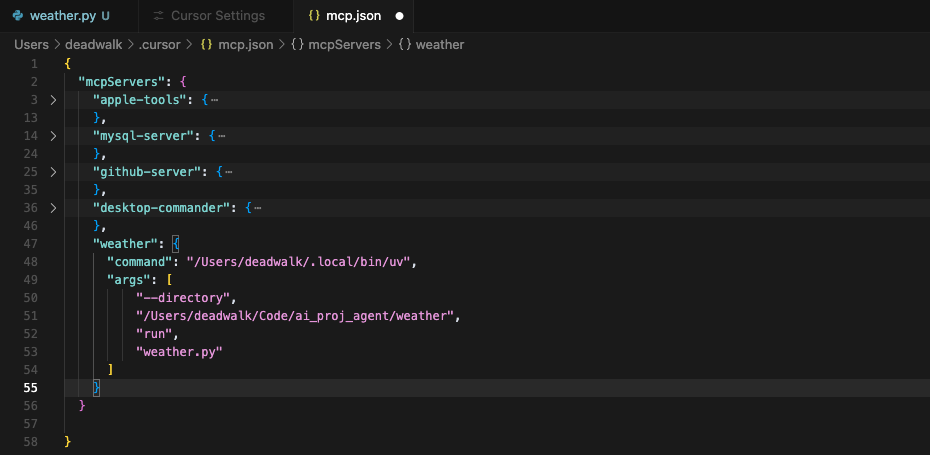
- 配置完毕MCPserver之后,启用weather服务(weather左侧的绿点点亮),然后在对话框中询问北京的天气情况即可获得查询结果。
运行结果:
总结
- MCP是一套服务间通信协议,它通过统一的协议,解决了大模型与工具间繁琐的适配通信问题。
- MCP的构成包括:MCP Host、MCP Client、MCP Server、Local Data Source、Remote Data Source。
- 封装MCP-server-weather服务时,需要在工具函数上添加@mcp.tool()装饰器。
- 通过MCP协议,我们可以封装各种服务提供给Cursor、Cherry-Studio、甚至我们自己开发的Agent使用,从而使得LLM+Agent的功能更加强大。
参考
其他文章
欢迎关注公众号以获得最新的文章和新闻